Introduction
Website performance continues to be one of the most important ranking factors for Google in 2025. Every day, we receive numerous requests from clients asking how to improve the loading speed of their WordPress websites. In this guide, we’ll explore the key factors that affect website performance and explain how to optimize your WordPress installation and theme configuration to achieve excellent Core Web Vitals results.
At XStore, performance optimization has always been one of our main priorities. With each new update, we refine and improve our theme’s efficiency – minimizing CSS and JavaScript file sizes, enhancing lazy loading, and improving overall resource handling. As a result, many areas of XStore have become lighter and faster, reducing file sizes by nearly 50% on average.
To demonstrate what XStore can achieve when properly optimized, we created a dedicated test website and applied every available optimization technique https://woocommerce-1476984-5641372.cloudwaysapps.com/ .

For our testing purposes, we ordered the cheapest hosting plan with 1GB ram and a single-core processor on Cloudways. You can check its pricing here https://www.cloudways.com/en/pricing.php
In this article, we will guide you through all the steps used in that process – from basic WordPress optimization to advanced adjustments within XStore → Theme Options → Speed Optimizations. You’ll also find recommendations for image compression, caching, and advice on troubleshooting slow websites or resolving specific Google PageSpeed Insights warnings.
XStore Theme Requirements
Before optimizing your site, make sure your hosting environment meets the minimum server requirements for the XStore theme. Many common problems — such as slow performance, white screens after installation, or demo import issues — are usually related to insufficient PHP configuration limits or low server resources.
You can adjust these settings manually or contact your hosting provider to increase them to at least the following values:
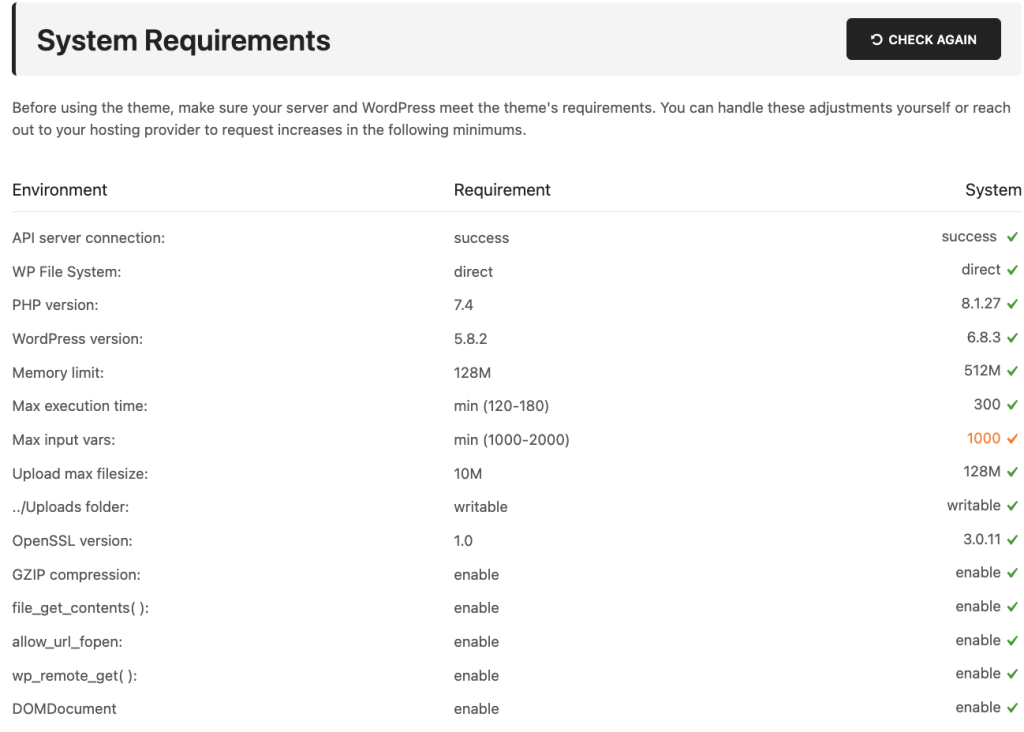
Sometimes, slow performance can be caused not by your theme or plugins but by your hosting service. If your site remains slow even after optimization, it’s likely a server-related issue. Contact your hosting provider to discuss possible upgrades or performance adjustments — because even a default WordPress installation can load slowly on underpowered servers.
Step 1. Install XStore and Add Your Own Content
When you first install the XStore theme on a new WordPress setup, it’s common to import one of our demo versions to help you get started. The demo content is designed to demonstrate the theme’s structure, layout options, and features – allowing you to quickly understand how everything works.
However, this sample data isn’t optimized for speed. It usually contains many high-resolution images, test pages, and placeholder products that you’ll eventually remove. For that reason, there’s no need to evaluate your website’s performance at this early stage.
Once the theme is installed, go through each section of your website and replace all demo content with your actual text, images, and products. This step is crucial — it clears unnecessary data and prepares your site for real visitors. Only after adding your real content should you start focusing on performance testing and optimization.
Before you begin creating pages, posts, or uploading media, make sure to follow these recommendations:
- Ensure your site uses a valid SSL certificate.
It’s a basic requirement not only for security but also for SEO and performance. If your website doesn’t yet have SSL, contact your hosting provider to install it. - Optimize your images before uploading.
Use properly sized and compressed images for each section. - Replace all demo images with your own.
Some sample images may still load from XStore demo servers, which can slow down your site. - Keep your pages lightweight.
Avoid adding too many sliders, animations, carousels, or large product grids on a single page. Each element increases the DOM size and overall load time. Keep your design clean, fast, and focused.
Step 2. Check Your Server Response Time and Basic Optimizations
A fast and stable hosting environment is the foundation of any high-performing WordPress website. Even the best-optimized theme can’t deliver great results if your server responds slowly. For our performance testing, we used Cloudways hosting, which provides excellent response times and reliability.
As a general benchmark, a clean WordPress installation without caching or extra plugins should have a server response time between 0.5s and 1.2s. Anything significantly higher may indicate a hosting issue or server misconfiguration.
Below are several ways to accurately measure your server’s response time:
Test different types of pages
Response time can vary from page to page. We recommend checking a lightweight page such as the Cart or My Account page, since these typically don’t include sliders, heavy images, or cached elements that could skew results.
Use WebPageTest for accurate results https://www.webpagetest.org/ and run a performance test for your site. In the “Waterfall” view, your server response time will be shown as the first request in the sequence.
Use Chrome DevTools (Network tab)
Right-click anywhere on your page and select Inspect (or press Ctrl + Shift + I / Cmd + Option + I).
Open the Network tab, reload your page, filter results by Doc, and review the response time for the main document request. This will show how quickly your server begins delivering content to the browser.
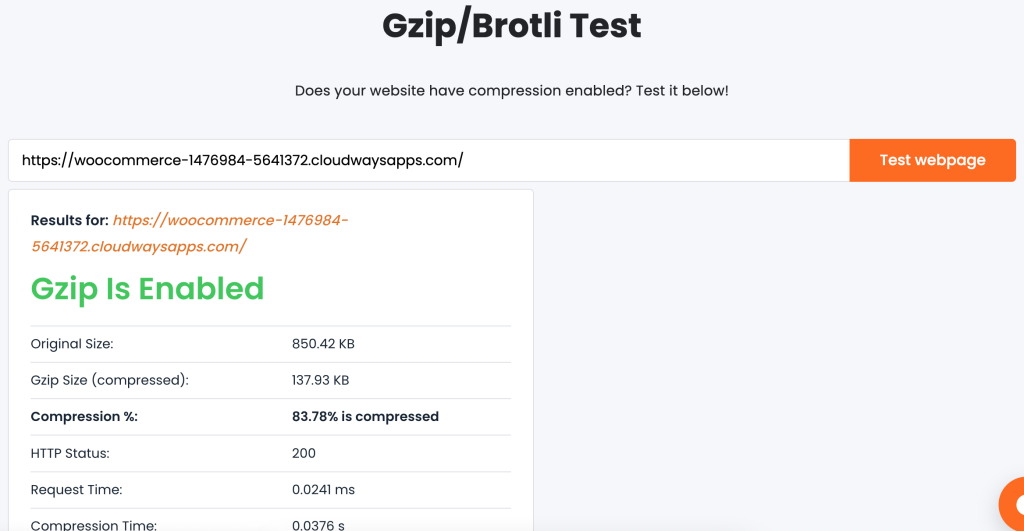
Enable GZIP Compression
To further reduce load times, make sure that GZIP compression is activated on your server. This feature compresses files before they’re sent to visitors, reducing transfer size and improving speed. Most modern hosting providers — including Cloudways and LiteSpeed servers — enable it by default.
If you’re unsure whether GZIP is active, you can verify it using https://www.giftofspeed.com/gzip-test/ .
If the test shows that compression is disabled, contact your hosting provider and ask them to enable it.
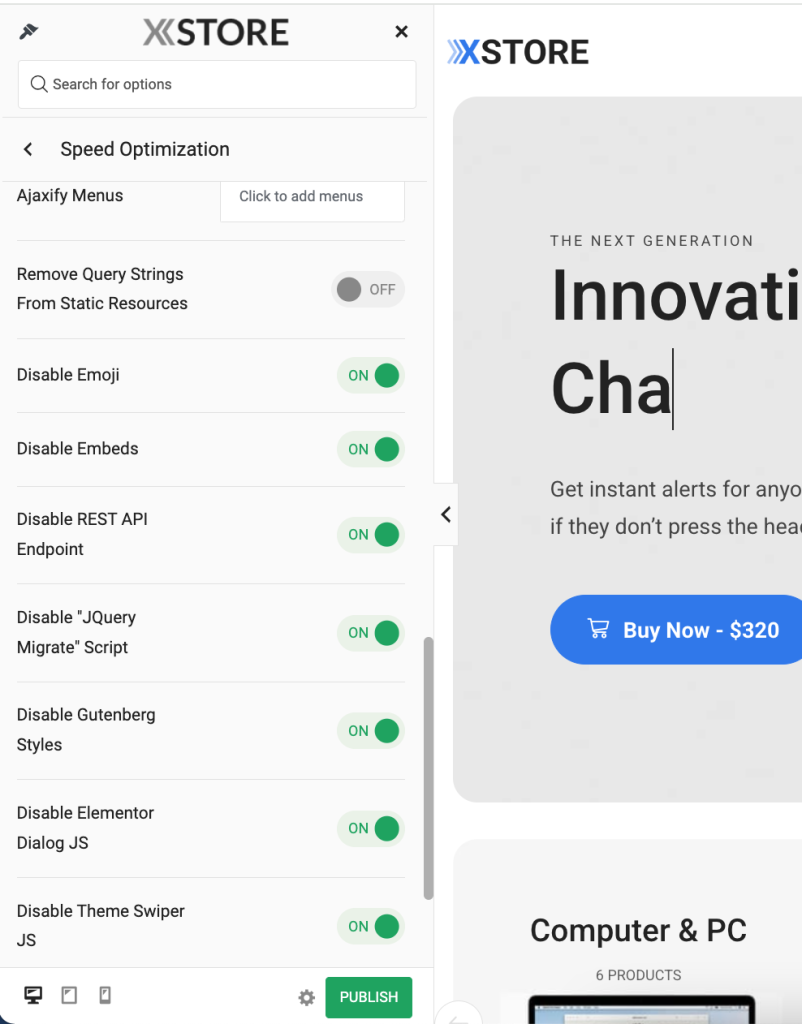
Step 3. Configure XStore Performance Settings
The XStore theme includes an intuitive Speed Optimization panel that allows you to boost your site’s performance without any coding skills. Whether you’re building an online store, portfolio, or blog, these settings can significantly reduce load times and improve your Core Web Vitals scores.
Navigate to Theme Options → Speed Optimization and review the following recommendations:
Image Loading Type
Select Lazy to delay loading off-screen images until users scroll to them. This reduces the initial page weight and improves the site’s first paint time.
Note that if a cache plugin is used, you can set the Default value for this option, as the plugin may already include other options that could conflict with lazy loading.
Disable Native WordPress Lazy Loading
When using XStore’s own lazy load feature, enable this option to avoid conflicts with WordPress native lazy loading.
Disable Old Browser Support
Prevents extra JavaScript files meant for outdated browsers from loading, saving bandwidth and improving performance on modern devices.
FontAwesome Support
If your site design doesn’t use FontAwesome icons (e.g., in menu items or widgets), set this option to Disable. This avoids loading around 50KB of additional font files.
Ajax Menu Dropdown
Loads dropdown menu content dynamically when a user hovers over it, instead of rendering everything during the initial page load. This helps reduce the DOM size and speeds up the first render.
Menu Dropdown Cache / Menu Cache
Caches menu data for faster subsequent visits. Recommended once your menu structure is finalized and no longer changing frequently.
Ajax Search Results Cache
Saves popular search queries in cache to display search results faster for repeated terms. Especially useful for WooCommerce stores.
CSS Minification
Compresses CSS files to their smallest possible size without affecting layout or design. This option should remain enabled on all production sites.
Disable REST API Endpoint
Disables unnecessary REST API endpoints if your site doesn’t rely on them. This improves security and slightly reduces server requests.
Disable “jQuery Migrate” Script
Most modern plugins and themes no longer require jquery-migrate.min.js. Enabling this option removes it to reduce JavaScript load and avoid redundant requests.
Disable Gutenberg Styles
If you use Elementor or WPBakery as your main builder, enable this option to stop WordPress from loading Gutenberg CSS/JS on the frontend.
Disable Elementor Dialog JS
Prevents the elementor-dialog script from loading unless you use video modals or popups.
Disable Theme Swiper JS
Both Elementor and XStore use the Swiper library for carousels. Enabling this prevents duplicate loading of the same script.
Disable Emoji and Embeds
Turns off WordPress’ built-in emoji and embed scripts (wp-emoji.js, wp-embed.js) that are not needed on most sites, reducing HTTP requests.
WordPress Image Quality
Adjusts the default quality for uploaded images. We recommend keeping it between 70–85 for an optimal balance between clarity and file size.
By enabling these optimizations, you can reduce your total page size by 20–50%, improve load times, and achieve higher scores on Google PageSpeed Insights and GTmetrix.
After any change, clear your cache and retest your site’s performance to ensure smooth operation.
Step 4. Image Optimization
Unoptimized or oversized images are among the most common reasons for poor website performance. In most WordPress installations, images account for 50–80% of the total page size, which means that proper image optimization can have an immediate and significant impact on your site’s loading speed and Core Web Vitals metrics.
- Recommended Image Sizes and File Weight
The overall file size of an image mainly depends on its pixel dimensions and compression level. As a rule of thumb:
Product and post images: up to 50–150 KB
Hero sections, banners, sliders: up to 150–200 KB
Any other images: should generally not exceed 200 KB
Keeping image sizes within these ranges ensures quick loading and a better user experience across all devices.
- How to Optimize Images Before Uploading
You can easily compress your images before uploading them using free online tools such as TinyPNG or Squoosh.
Simply upload your image, download the optimized version, and replace the original.
- Setting Proper Image Dimensions
Optimizing image compression alone isn’t enough — it’s also important to display images at the correct size on the page.
For instance, if your site’s main container width is 1200px and you display 6 products per row, your product thumbnails shouldn’t exceed 200px in width.
Please additionally read the official article provided by WooCommerce.
Here’s how to configure image sizes in key areas:
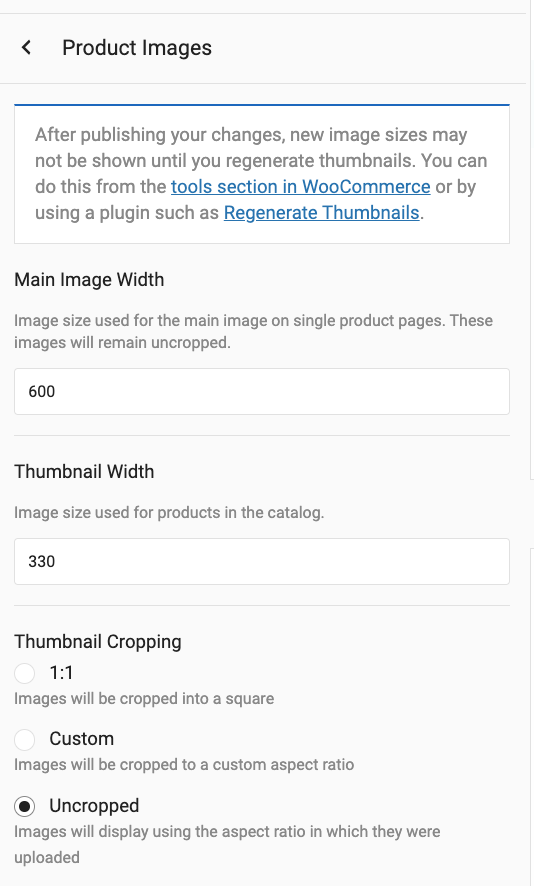
Shop and product pages:
Go to Dashboard → Appearance → Customize → WooCommerce → Product Images and adjust the width, cropping, and thumbnail ratio.
Blog posts:
Configure the default media sizes under Dashboard → Settings → Media.

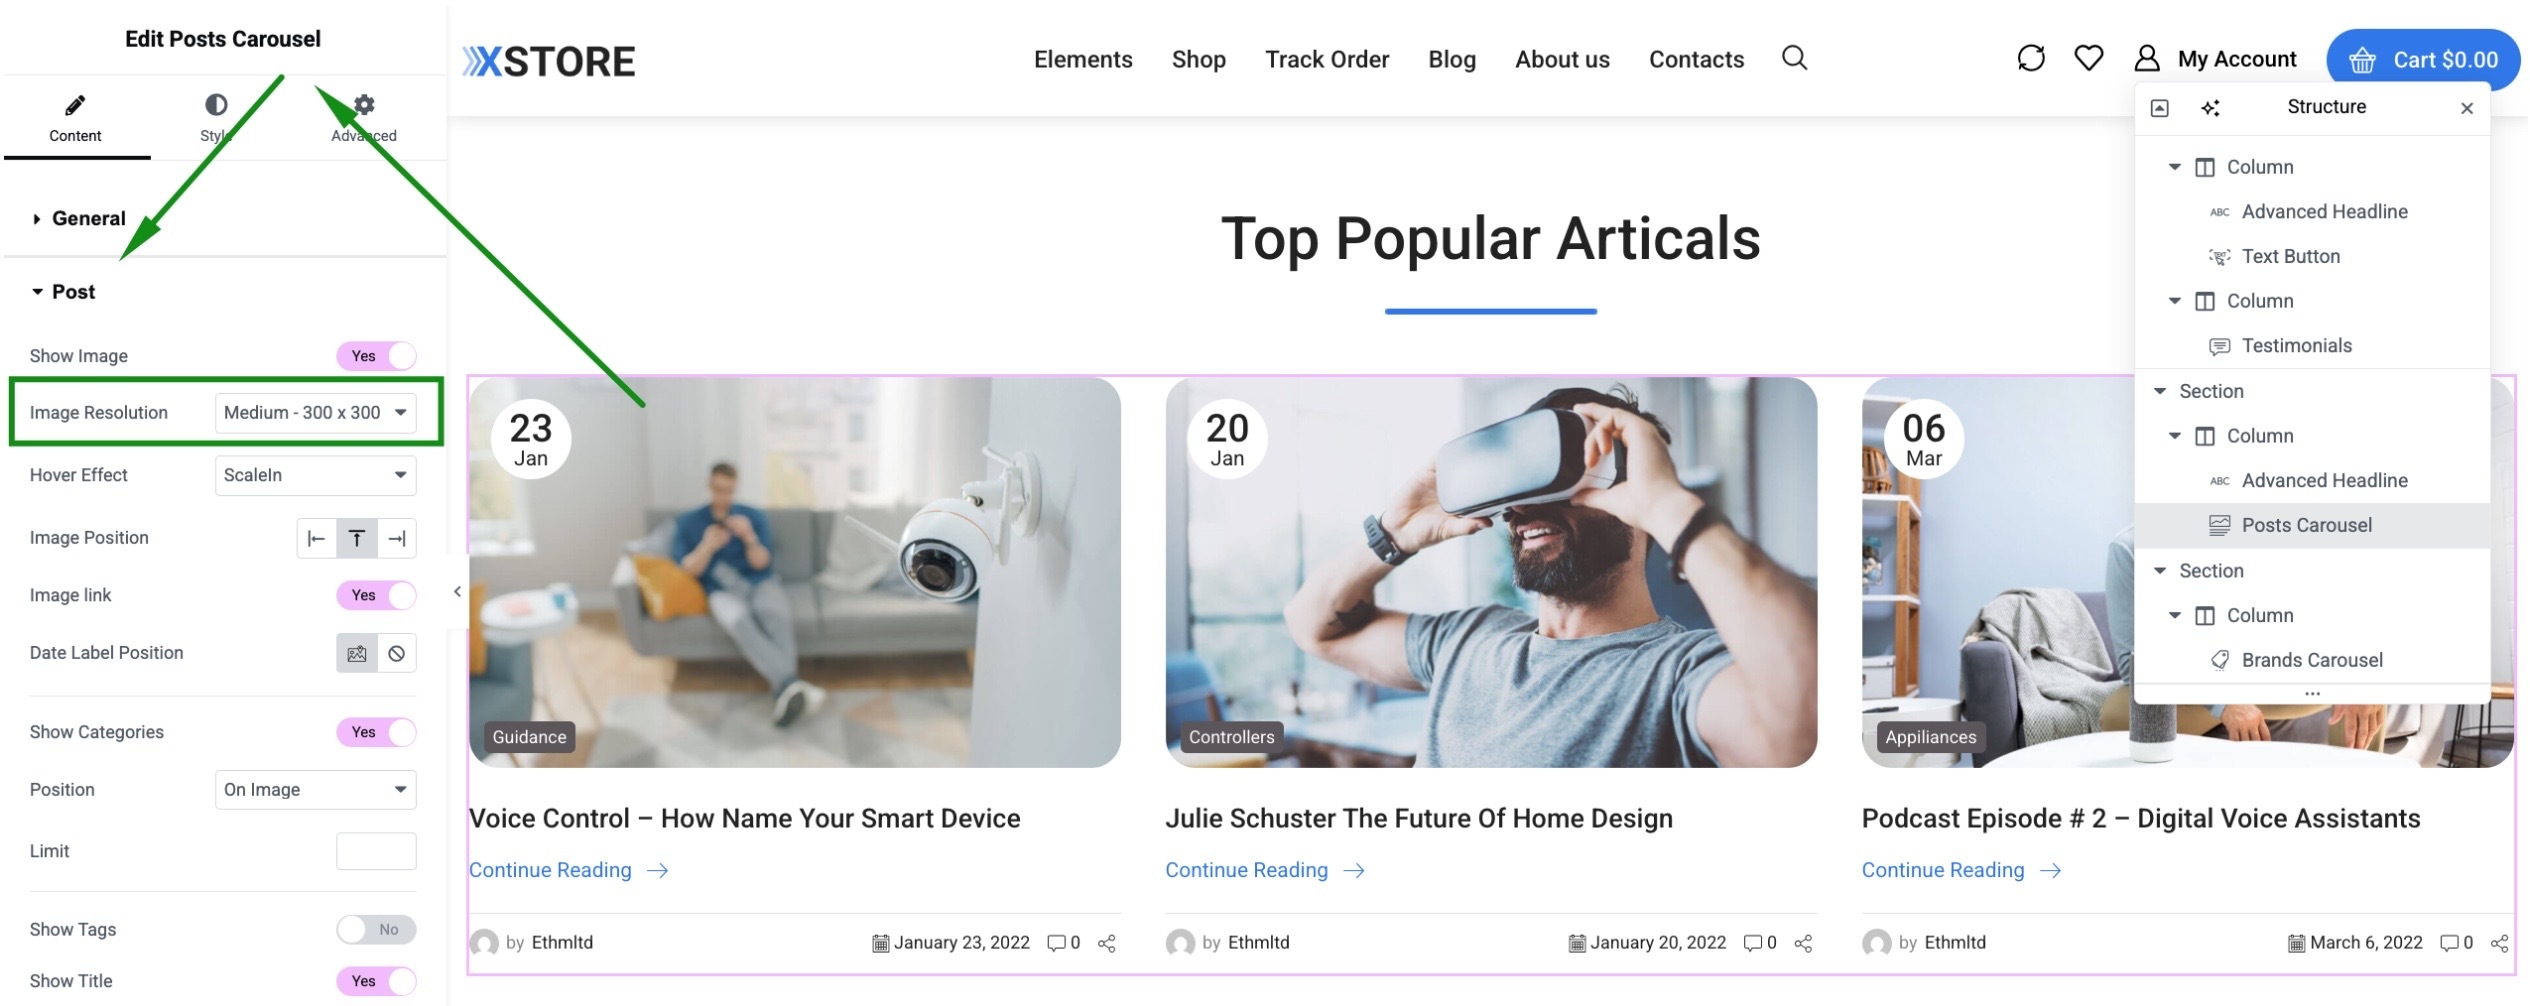
Individual elements (banners, galleries, info boxes, etc.):
When editing with Elementor or WPBakery Page Builder, select the proper image size directly inside each element’s settings.
Step 5. Install the WP Rocket Cache Plugin
Caching is one of the most effective ways to boost your WordPress website’s speed. A well-configured cache plugin can significantly reduce server response time (TTFB) and make your pages load almost instantly.
For our test case, we used WP Rocket — one of the most powerful and user-friendly caching plugins available.
In addition to page caching, it offers tools for CSS and JavaScript optimization, database cleanup, and easy integration with global CDNs (Content Delivery Networks).
If you’re using Cloudways hosting, note that it comes with its own caching system (Breeze). You can either continue using it or disable it and install WP Rocket instead.
If you’re looking for a free alternative, you can try Autoptimize, W3 Total Cache, or WP Super Cache – they follow the same optimization principles described below.
Recommended WP Rocket Configuration for XStore
After activating the plugin, go through its settings and enable the following key options for the best compatibility and performance with XStore:
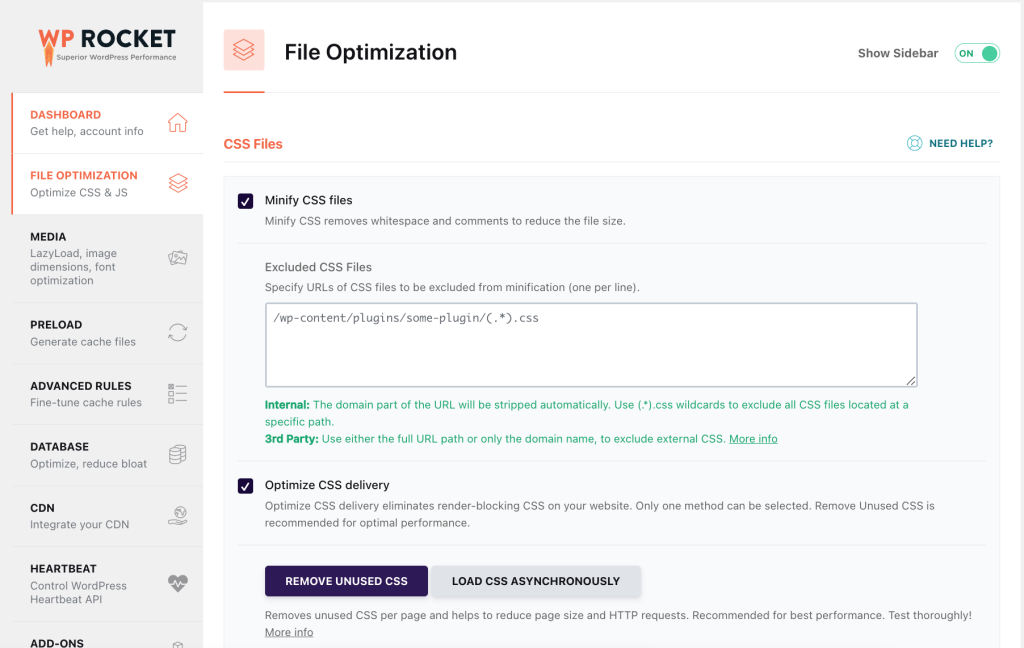
- File Optimization → CSS Settings Enable Minify CSS files to reduce their size and speed up delivery.
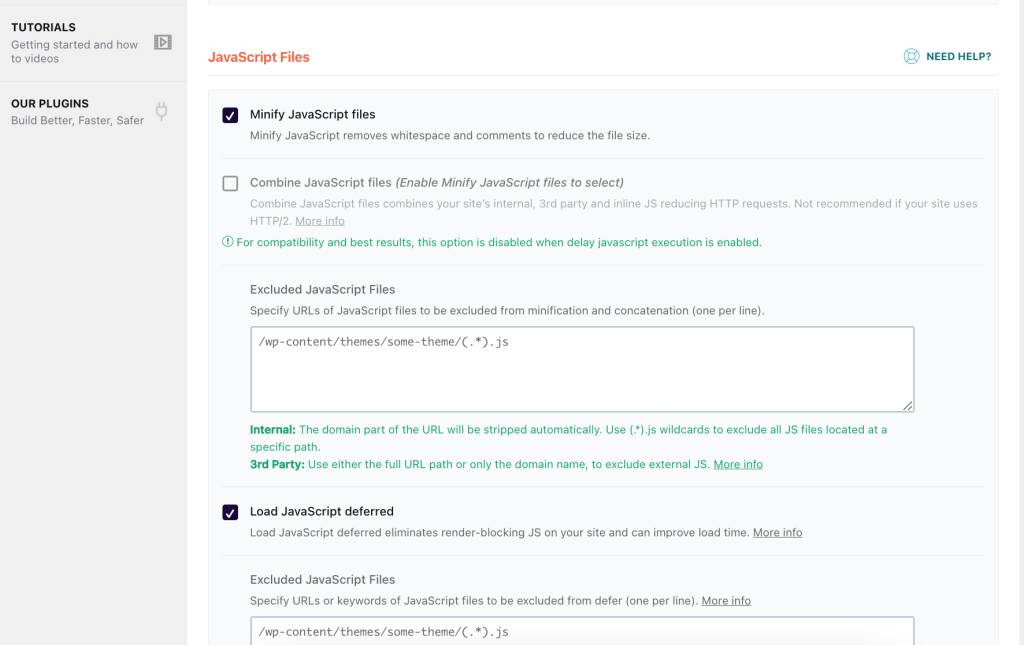
- File Optimization → JavaScript Settings Enable Minify JavaScript files
Enable Load JavaScript deferred
These options ensure that JavaScript loads only after the HTML content, improving First Contentful Paint (FCP) and Largest Contentful Paint (LCP) times. - Delay JavaScript Execution
This feature can further improve performance by delaying non-critical scripts until user interaction.
However, it can sometimes delay interactive elements (like sliders or menus).
Other WP Rocket options (like CDN setup, database cleanup, or preload settings) can also improve performance depending on your hosting and site structure. Feel free to experiment and test different combinations using Google PageSpeed Insights, GTmetrix, or WebPageTest.
Step 6. Setup CDN
A Content Delivery Network (CDN) is a network of servers distributed across different regions of the world. Instead of serving all files from a single hosting location, a CDN caches and delivers your static assets — such as images, CSS, JavaScript, and fonts — from the server that is geographically closest to each visitor.
For websites with traffic coming from multiple countries or continents, a CDN can:
– Decrease the loading time of static resources
– Improve Core Web Vitals (especially for users far from your main server)
– Reduce the load on your origin server
If you plan to use a CDN with your XStore-based website, we recommend solutions like KeyCDN or RocketCDN — both are fast, reliable, and simple to configure. You can also use Cloudflare or another provider if you’re already familiar with it.
Below is an example setup using KeyCDN together with WP Rocket.
Step-by-Step: Configuring KeyCDN with WP Rocket
1. Create a KeyCDN account
Go to the KeyCDN website and register a new account.
2. Create a new “Zone”
In your KeyCDN dashboard, open the Zones section and click Add Zone (or similar).
3. Set the Origin URL
In the Origin URL field, enter your website’s root URL (for example, https://yourdomain.com).
This tells KeyCDN where to pull the original files from.
4. Save and deploy the Zone
Click Save and wait a few minutes while KeyCDN provisions the new zone across their network.
5. Copy the Zone URL
Once the zone is active, you’ll see a Zone URL (something like https://yourzone-abcdef.kxcdn.com).
Copy this URL — you’ll need it in the next step.
6. Connect WP Rocket to the CDN
In your WordPress dashboard, go to Settings → WP Rocket → CDN (or the CDN tab in your cache plugin of choice).
Enable the CDN option
Paste your Zone URL into the corresponding CDN CNAME/URL field

7. Save settings and clear cache (both WP Rocket cache and any CDN cache from the KeyCDN panel).
8. Verify that the CDN is working
Open your website in a browser, inspect the page source or Network tab, and check that static files (images, CSS, JS) are being loaded from the CDN domain instead of your main domain.
How to fix Google Page Speed warnings
Each Google PageSpeed Insights report is unique — the results and warnings depend on your site’s structure, plugins, content, and hosting environment. Below, we’ll review the most common issues you may encounter and show you how to resolve them effectively.
- Eliminate Render-Blocking Resources
This is one of the most common PageSpeed warnings for WordPress sites.
Render-blocking happens when CSS, JS, or font files in the of your website delay the initial paint of the page.
To address this, review each file listed in your PageSpeed report and determine whether it’s essential. Here are typical solutions:
Disable Gutenberg styles
If you’re using Elementor or WPBakery, disable Gutenberg CSS and JS under
Theme Options → Speed Optimization → Disable Gutenberg Styles.
Avoid duplicate Google Fonts
Make sure Google Fonts are loaded only once — preferably from XStore.
Elementor often loads its own fonts; to disable them, open any page with Elementor, go to
Site Settings → Global Fonts, and reset all fonts to “Default.”
Use local or system fonts
To minimize blocking time, consider hosting Google Fonts locally. XStore > Custom Fonts > Upload font.
This eliminates external font requests entirely.
Limit Font Awesome usage
Both Elementor and some plugins load the full Font Awesome library even for a single icon.
If you use just a few icons, replace them with SVG icons instead.
You can also disable Font Awesome globally under Theme Options → Speed Optimization → FontAwesome Support.
- Reduce Unused JavaScript
Another common warning is “Reduce unused JavaScript.”
This typically comes from third-party plugins that load large JS files across your entire site — even on pages where they’re not needed.
Disable global plugin scripts
Many visual builders and slider plugins (like Slider Revolution) include global JS libraries.
If you use Slider Revolution, go to Slider Revolution → Globals → Include libraries globally → OFF, to prevent unnecessary scripts from loading on every page.
Remove unused plugins
Deactivate and uninstall plugins that you no longer use — each one adds additional JS and CSS.
Prefer lightweight built-in elements
Instead of heavy third-party sliders or galleries, use XStore’s built-in sliders and banners, which are optimized for performance.
- Reduce Initial Server Response Time
This metric measures how quickly your server starts sending data after a request.
A slow Time to First Byte (TTFB) can significantly impact your overall PageSpeed score.
Here’s how to improve it:
Use a caching plugin
Install and configure WP Rocket or another caching plugin.
It will dramatically reduce the time needed to generate pages and send the first byte to the browser.
Be patient after clearing cache
If you clear the cache, some styles on the pages may change (break) for a few seconds, but that’s normal because the files are being cached, so just wait reload the page.
Check for plugin or theme conflicts
Disable all external plugins temporarily and recheck the server response time.
Then reactivate them one by one to identify any that cause delays.
Compare with the default WordPress theme
Switch temporarily to a default theme like Twenty Twenty-Four and test again.
A 10–15% difference is normal, but if the default theme loads 2–3× faster, investigate further – it could be caused by a plugin or server limitation.
Contact your hosting provider
If your TTFB exceeds 2 seconds even on a clean installation without plugins, the problem is likely with the hosting environment.
Ask your provider to review database performance, PHP worker limits, and caching configuration.
Conclusion
Optimizing your WordPress website’s performance isn’t a one-time task — it’s an ongoing process of refining your hosting setup, theme configuration, and content delivery strategy. With the right adjustments, XStore can easily achieve 90+ PageSpeed scores and deliver an exceptional experience for your visitors on any device.
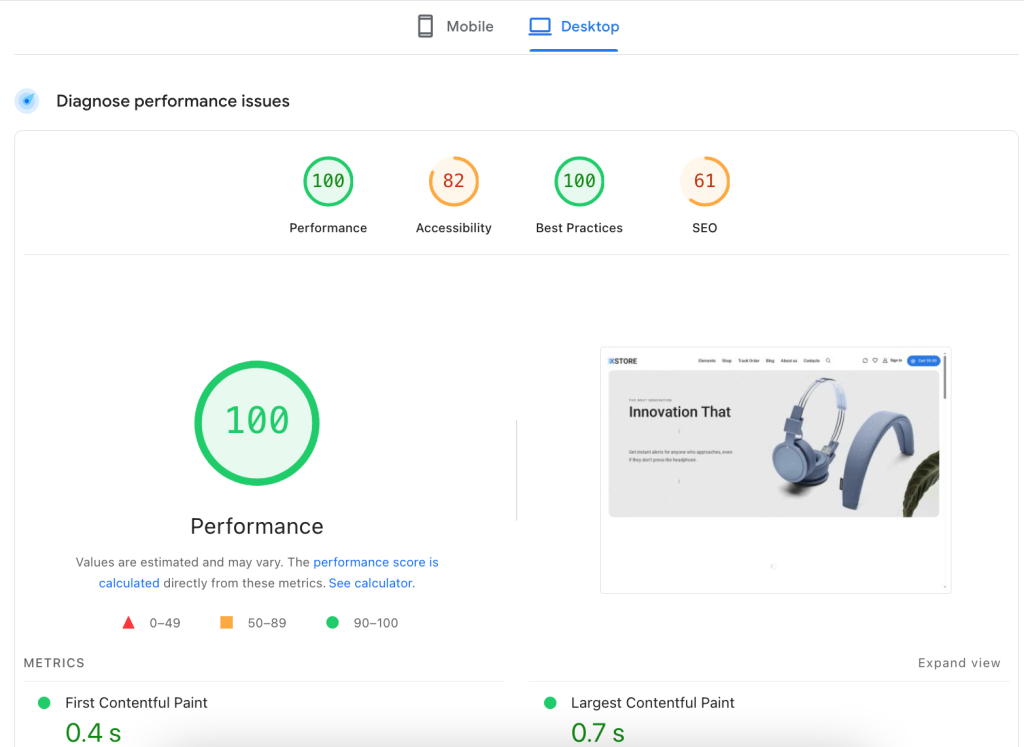
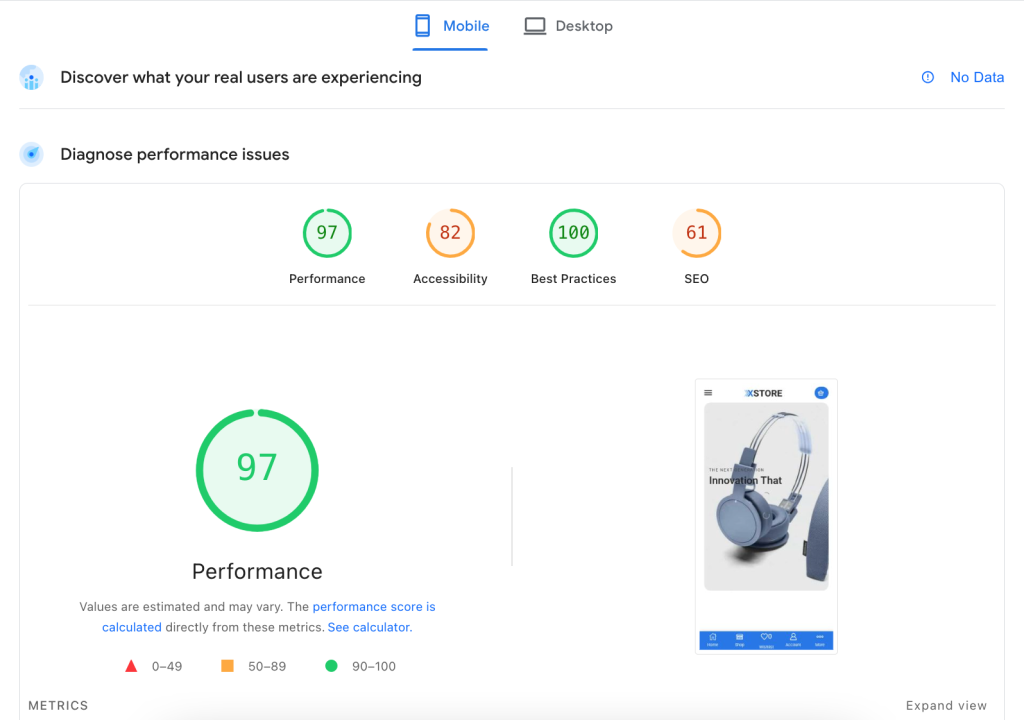
The examples and steps we’ve covered in this guide are based on our optimized demo site:
https://woocommerce-1476984-5641372.cloudwaysapps.com/
Remember: real performance improvements come from balance – loading only what’s necessary, using modern formats, and keeping your website lightweight while maintaining its design and functionality.