Template Type #
Choose from multiple layout templates to control the visual structure of the offer. Templates may differ in layout, stacking, or card-based designs.
Minimal – A clean and straightforward design focused on simplicity and functionality. Perfect for stores that prefer a sleek visual approach without unnecessary elements. This template presents additional product information in a clear and user-friendly manner.
Colorful – A vibrant and eye-catching design created to draw attention to additional products in the cart. It uses accent colors to highlight discounts, options, or key elements. Ideal for stores aiming to boost conversions with a visually appealing and engaging style.
💡 The selected template may affect the availability of some display options and elements in the Offer section.
Offer #
General
Offer Product
Choose the product that will be offered as part of the deal.
This is the product that will receive a discount or special treatment when the combo is triggered.
Offer Quantity
Set the quantity of the offer product that will be added to the cart.
Discount Type
Choose how the discount is applied to the offer product.
Available options:
- Percentage – e.g., 20% off
- Fixed – e.g., $5 off
- Free – price is reduced to $0
- No discount – no discount is applied. Offer product will be shown with their regular price.
Discount Value
Specify the discount amount based on the selected type.
- For percentage – enter a number like 15 (for 15% off)
- For fixed – enter a value like 10 (for $10 off)
Note: Not applicable if “Free” or “No discount” is selected.
Total Usage Limit
Set the maximum number of times this offer can be used across all customers.
💡 Useful for running limited-time campaigns or stock-controlled offers.
Usage Limit Per Customer
Define how many times an individual customer can claim the offer.
💡 Helps prevent abuse of the promotion by restricting repeated use per user.
Content
Offer Title
Sets the offer title.
Use this to briefly describe the offer or provide context (e.g., “You get this as a bonus”, “Free gift with purchase”, or “Add this to complete your combo”).
💡 Helps reinforce value and explain the offer clearly.
Offer Title Badge
Adds a visual label or tag next to the title (e.g., “Free”, “Limited”, or “Bonus”).
💡 This badge helps draw attention and highlight the uniqueness of the offer item.
Offer Subtitle
Sets the offer subtitle.
Adds a short supporting message beneath the title.
Use it to add context or highlight extra value (e.g., “No extra cost – it’s on us”, “Limited-time freebie”, or “Pairs great with your selection”).
💡 Complements the title by offering more detail or urgency.
Offer Subtitle Badge
Adds a visual label or tag next to the subtitle (e.g., “Free”, “Limited”, or “Bonus”).
💡 This badge helps draw attention and highlight the uniqueness of the offer item.
Offer CTA Button Text
Customize the text on the call-to-action button for the offer (e.g., “Add Gift”, “Claim Bonus”, or “Include Item”).
💡 Use clear, persuasive wording to drive clicks and conversions.
Offer Image Source
Select where the image for the offer product will come from.
Options typically include:
Product Thumbnail – default image of offer product
Custom Image – upload a unique graphic for better visual impact
💡 Allows you to tailor the design to match your brand or promotional theme.
Timer Settings #
Enable the offer expiration countdown timer notice
Activates a visible countdown timer for the offer.
When enabled, customers will see a timer (e.g., 01:30) indicating how long the offer is available.
If the timer expires before the user accepts the offer, the deal will be skipped, and the order process continues normally.
💡 Ideal for creating urgency and increasing conversions.
Duration (MM:SS)
Sets the total time the offer will remain visible to the customer.
Use a format like 01:00 for 1 minute or 00:30 for 30 seconds.
💡 Keep it short to encourage fast decision-making without overwhelming the user.
Message
Customize the message that appears above or next to the countdown timer.
Use dynamic, action-driven text (e.g., “Limited Time Offer”, “Act Fast”, or “Only available for the next few seconds”) to create urgency.
💡 You can also localize the message based on your store language.
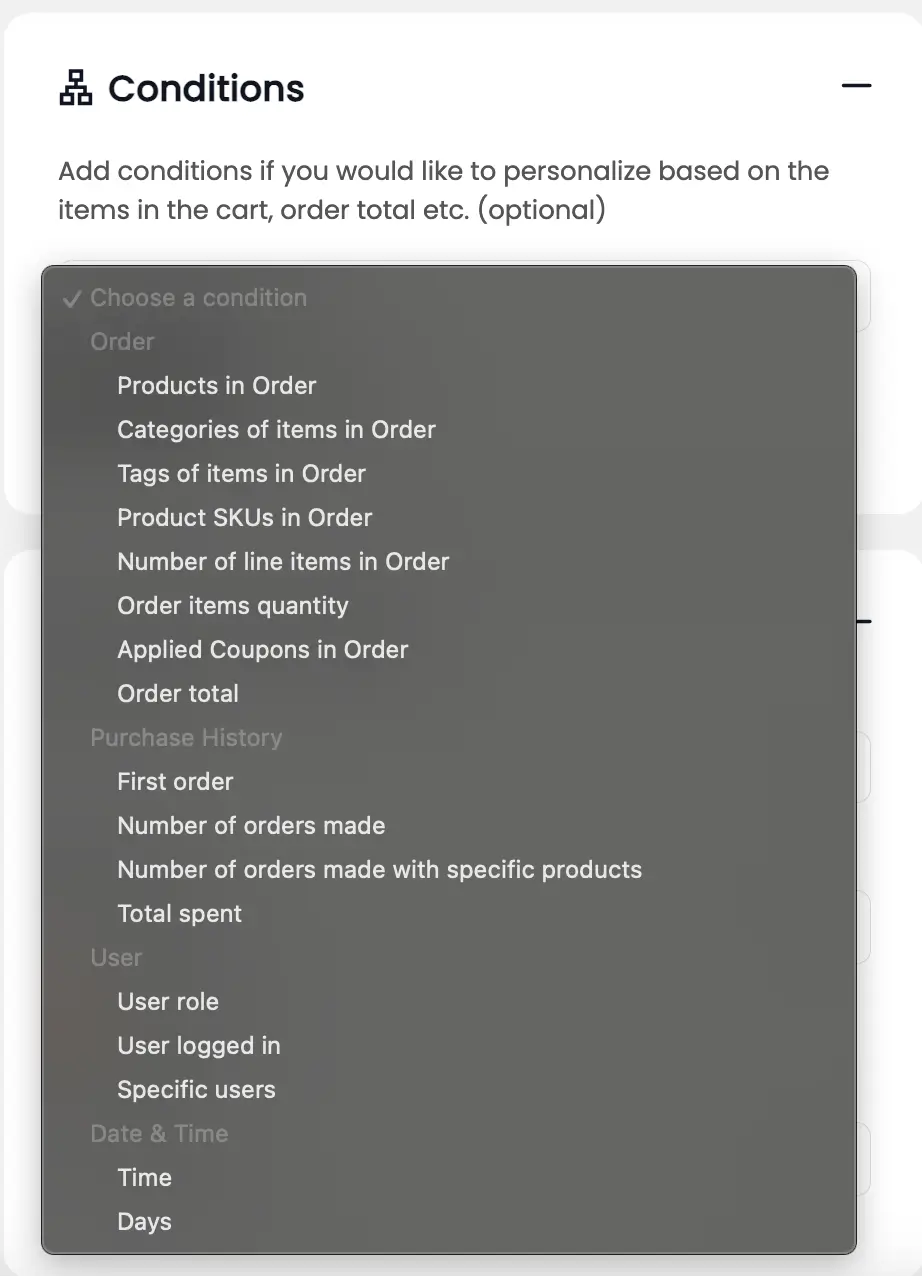
Display Conditions #
Most boosters support “conditional visibility” based on order, time, and other parameters. These rules allow you to target very specific use cases, like:
– Show only during business hours (e.g., 9:00 AM – 6:00 PM)
– Activate only when a product from category “Accessories” is purchased
– Display for users from specific roles (e.g., logged-in customers)
Frontend Result #
Once configured, the Post Purchase Upsells booster displays a targeted product offer immediately after checkout, before the Thank You page is fully shown.
If the customer accepts the offer, the additional product is added to the original order seamlessly — without requiring a new checkout session or separate payment.
💡 This experience is smooth, distraction-free, and designed to maximize conversions right after the customer has already committed to buying.
Troubleshooting #
If your booster isn’t displaying as expected, check the following:
- Confirm the booster is enabled
- Ensure the filters match the order
- Disable aggressive caching plugins temporarily
- Make sure your payment gateway is compatible with post-purchase behavior