Template Type #
Choose from multiple layout templates to control the visual structure of the popup offer.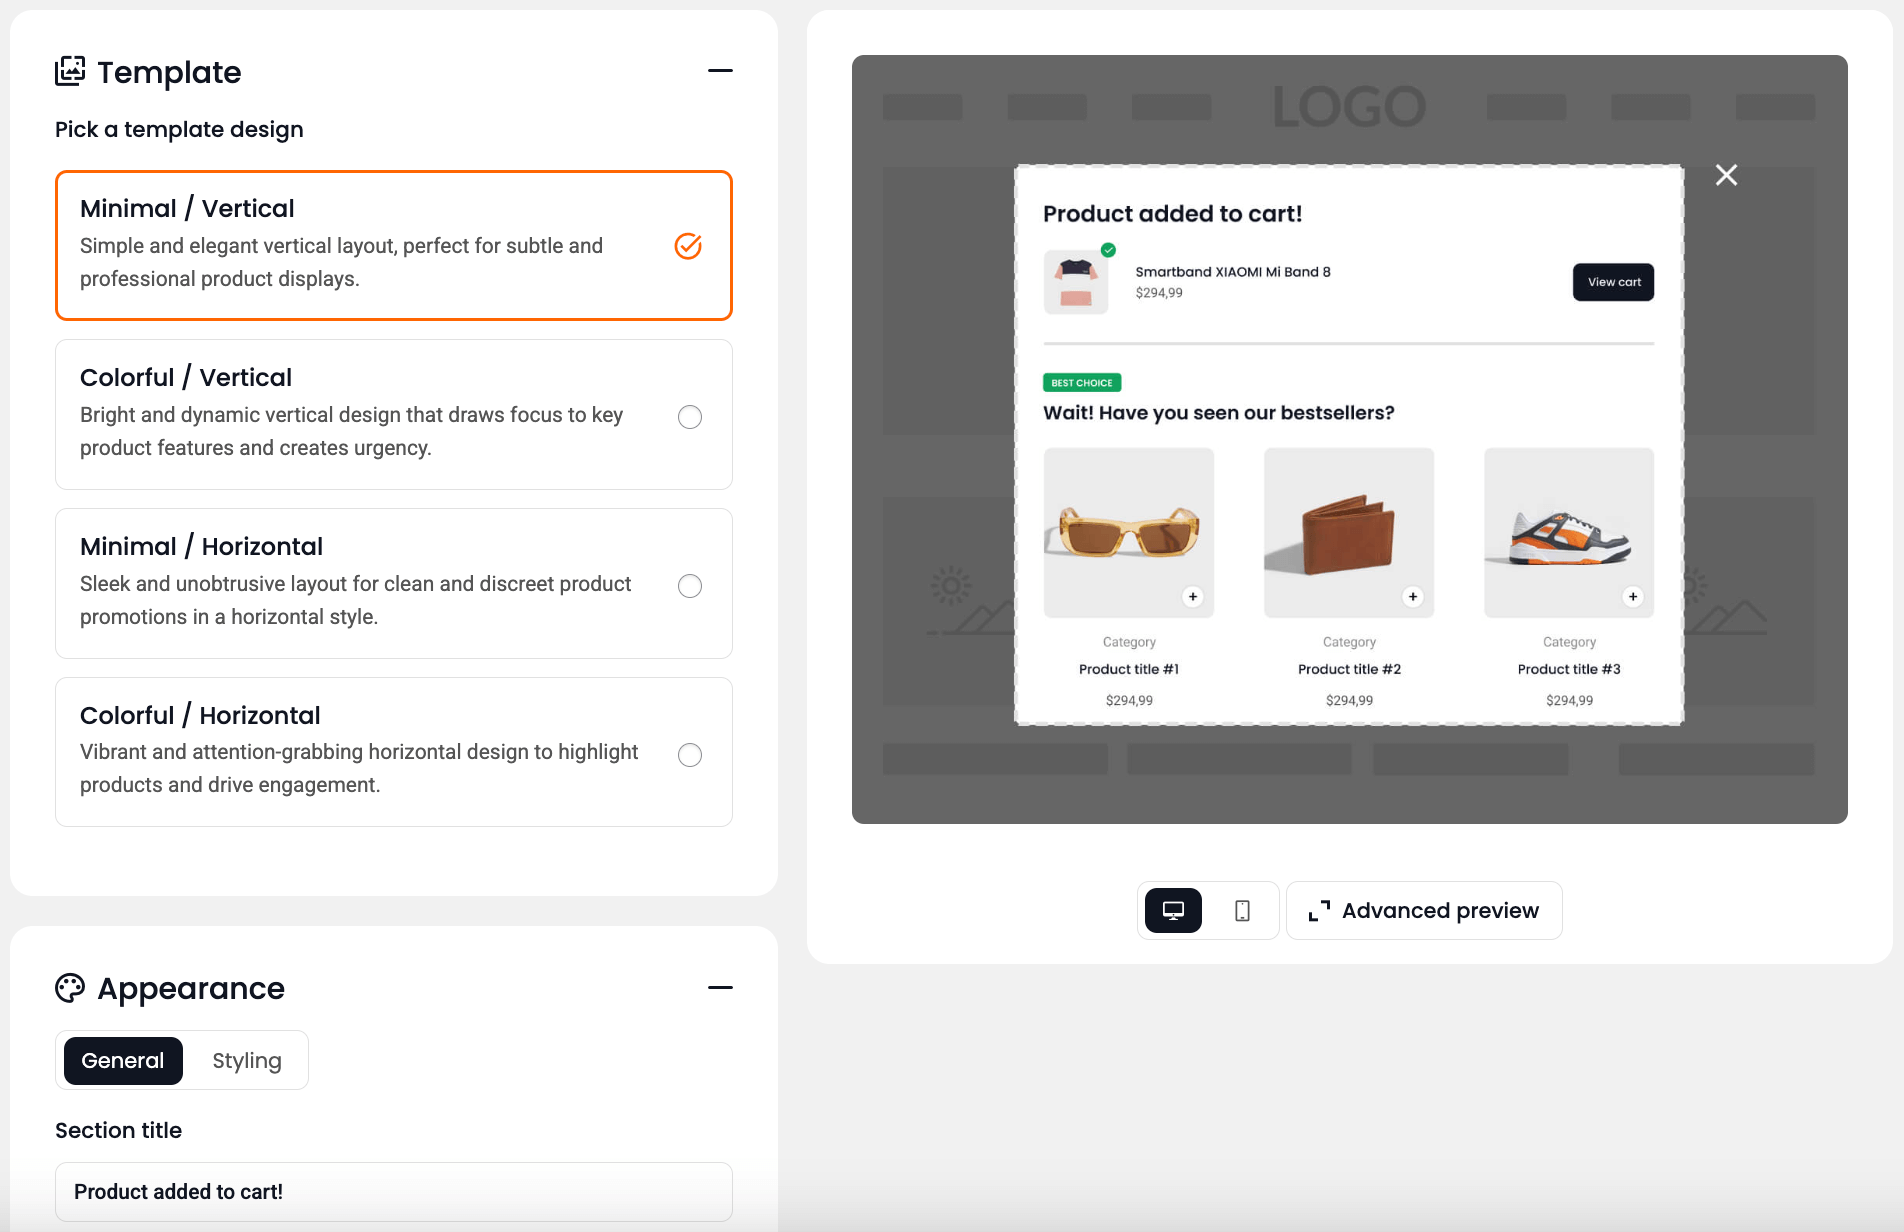
– Minimal / Vertical – Simple and elegant vertical layout, perfect for subtle and professional product displays.
– Colorful / Vertical – Bright and dynamic vertical design that draws focus to key product features and creates urgency.
– Minimal / Horizontal – Sleek and unobtrusive layout for clean and discreet product promotions in a horizontal style.
– Colorful / Horizontal – Vibrant and attention-grabbing horizontal design to highlight products and drive engagement.
💡 The selected template may affect the availability of some display options and elements in the Appearance section.
Appearance #
Customize the visual layout and content of the popup to match your store’s design and clearly communicate the offer.
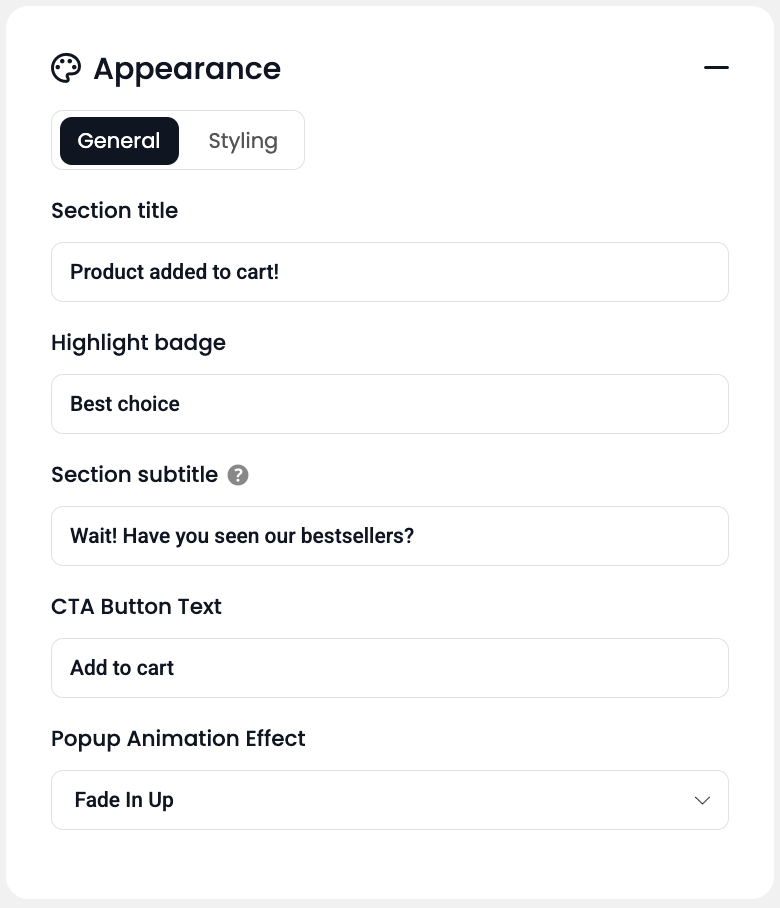
General
The following options are available:
Section Title
Sets the main heading for the popup.
Use this to briefly describe what the popup is about (e.g., “Complete Your Order”, “Recommended Add-ons”, or “Popular Picks”).
This helps the customer immediately understand the purpose of the popup.
Section Subtitle
Optional supporting text shown below the title.
Use it to add a short explanation or promotional hook (e.g., “Customers often buy these together” or “Don’t miss these add-ons”).
It adds context and encourages action.
Highlight Badge
Displays a small badge or tag near the title or offer area.
Ideal for drawing attention to urgency or exclusivity (e.g., “Hot Deal”, “Only Today”, “One-Time Offer”).
Use it to reinforce why the customer should take immediate action.
CTA Button Text
Customize the call-to-action text on the popup button (e.g., “Add to Cart”, “Get This Deal”, “Yes, Include It”).
Tailor the message to match the tone of your offer and reduce friction in the decision-making process.
Popup Animation Effect
Choose how the popup appears on the screen — for example:
– Fade In
– Fade In Up
– None
💡 Tip: The animation can help attract attention while maintaining a smooth, non-intrusive experience.
Note: The appearance and availability of certain design options may vary depending on the selected template layout.
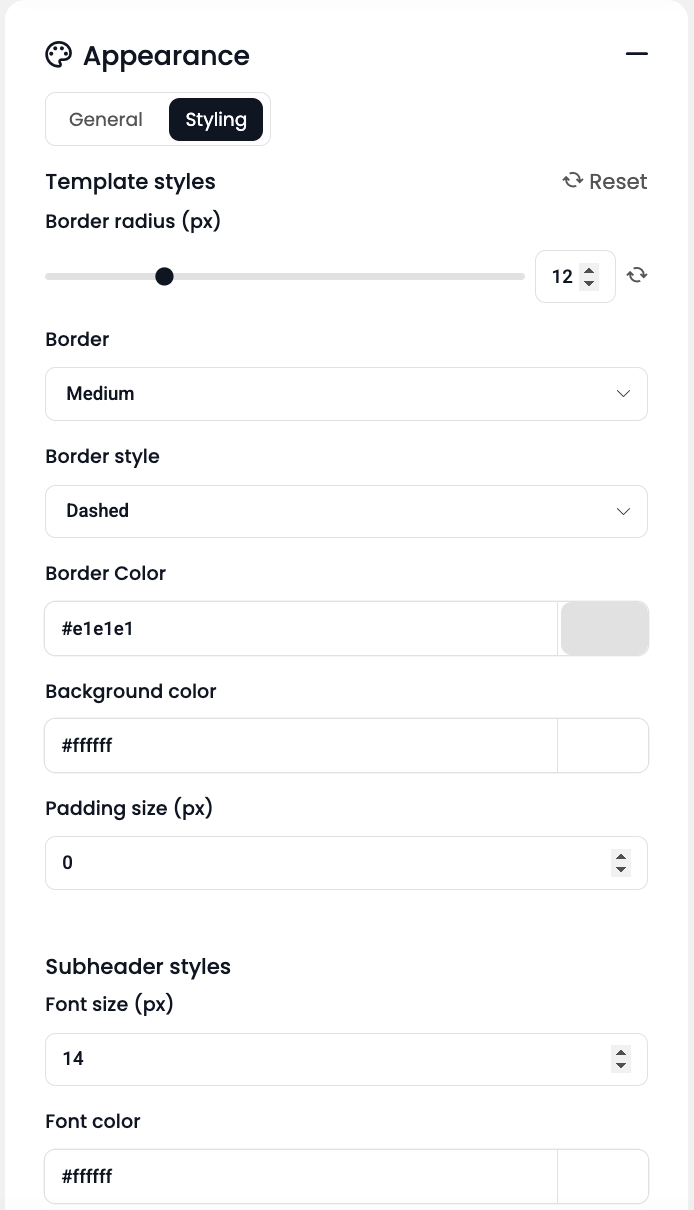
Style
This section allows you to fine-tune the visual appearance of the popup and its contents — no coding required.
You can adjust styles such as spacing, background colors, typography, button design, and animation behavior to align the popup with your store’s branding and user experience.
Make your popup stand out or blend in seamlessly, depending on your goal — whether it’s a bold promotion or a subtle product suggestion.
Here you can adjust:
Layout spacing
(padding and margins)
Container styling
(border radius, border color, background)
Typography
for titles, subtitles, and badges
CTA button colors and fonts
These options allow you to match the booster’s design with your site’s overall branding and UX preferences.
Note: Some style options may vary slightly depending on the selected template.
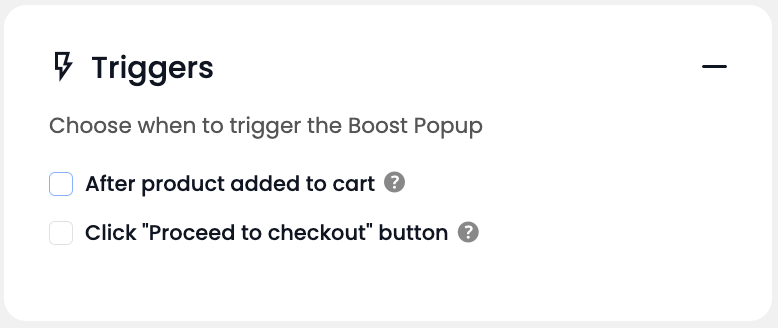
Triggers #
Control when and where the Boost Popup appears based on user actions, product context, and cart behavior.
You can enable one or both of the following triggers:
After product added to cart
The popup appears immediately after a customer adds an item to their cart.
Additional configuration options:
- Popup shows to:
Choose which product interactions should trigger the popup:- All products
- Specific products
- Specific categories
- Product suggestion method works based on:
Define how the popup determines which products to suggest:- Cart products – suggestions are based on all current cart items
- Added product (recently) – suggestions are based on the most recently added product
💡 This setup allows you to deliver highly relevant suggestions in real time.
Click “Proceed to checkout” button
Displays the popup when the customer clicks the “Proceed to Checkout” button on the cart page.
💡 Use this to deliver last-minute upsells or complementary product offers before they reach the checkout.
Both triggers can be used independently or combined for layered targeting.
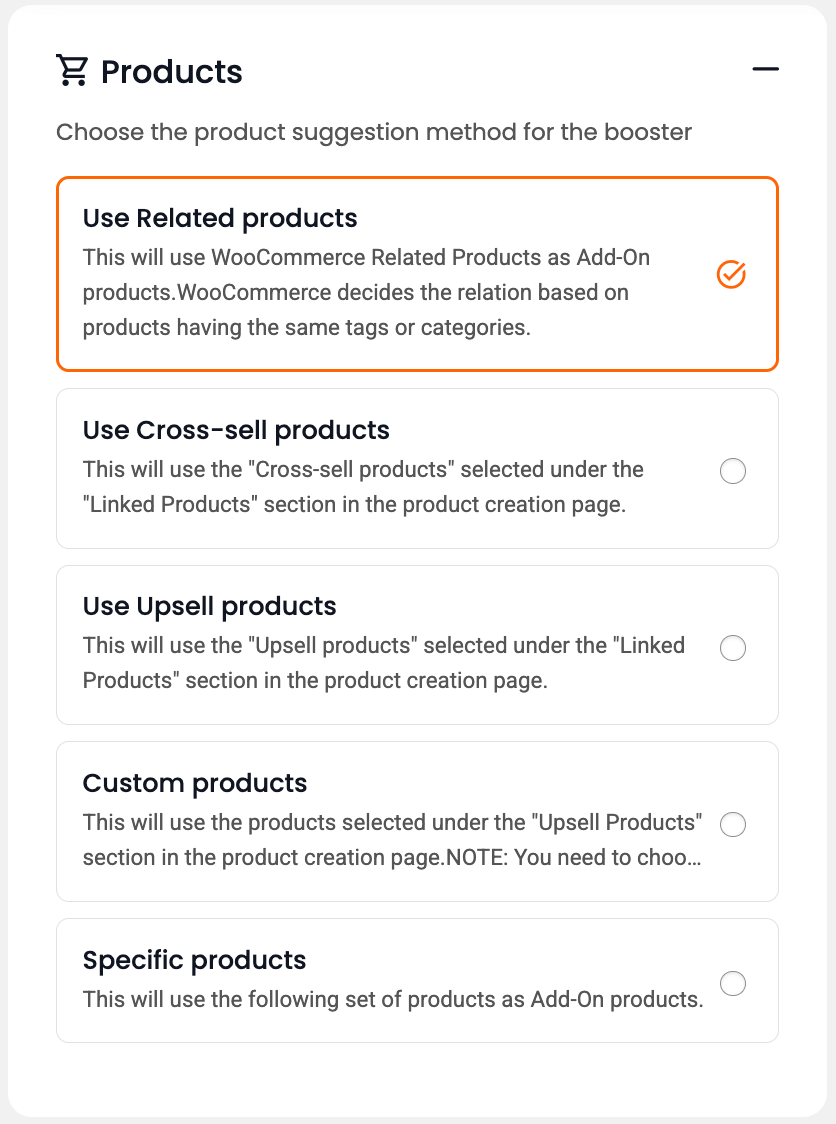
Products #
This section lets you control how products will be selected and handled inside the booster.
You can choose between few suggestion methods:
Use Related products
This will use WooCommerce Related Products as Upsell products. WooCommerce decides the relation based on products having the same tags or categories.
Use Cross-sell products
This will use the “Cross-sell products” selected under the “Linked Products” section in the product creation page.
Use Upsell products
This will use the “Upsell products” selected under the “Linked Products” section in the product creation page.
Specific products
This will use the following set of products as Upsell products. Use the product search to find and add items.
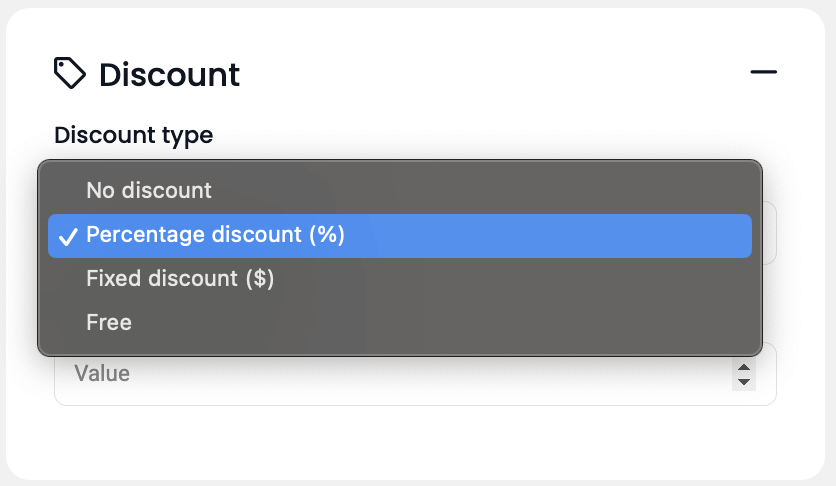
This section controls whether and how discounts are applied to the products displayed in the booster. You can choose from multiple discount types depending on your campaign strategy — whether you’re promoting bundles, upsells, or volume-based savings.
Discount Type
- None* – no discount is applied. Products will be shown with their regular price.
- Fixed Discount – applies a specific discount amount (e.g., $5 off) to each product in the booster.
- Percentage Discount – applies a percentage-based discount (e.g., 10% off) to each product individually.
- Free* – makes selected product(s) in the combo completely free (e.g., 100% off). You can apply this to one or more items within the booster. The product will appear in the cart with a $0.00 price.
Note: Available discount options may vary depending on the booster type and its specific configuration.
Example Scenarios
- Fixed discount: Each add-on gets $3 off — perfect for simple bundles.
- Percentage discount: 20% off each item — great for add-on accessories.
Visibility
You can configure how the discount is shown on the frontend using badges or price formatting (this is controlled in the display settings).
If a product already has a sale price, you may optionally exclude it from receiving additional discounts.
Via general settings:
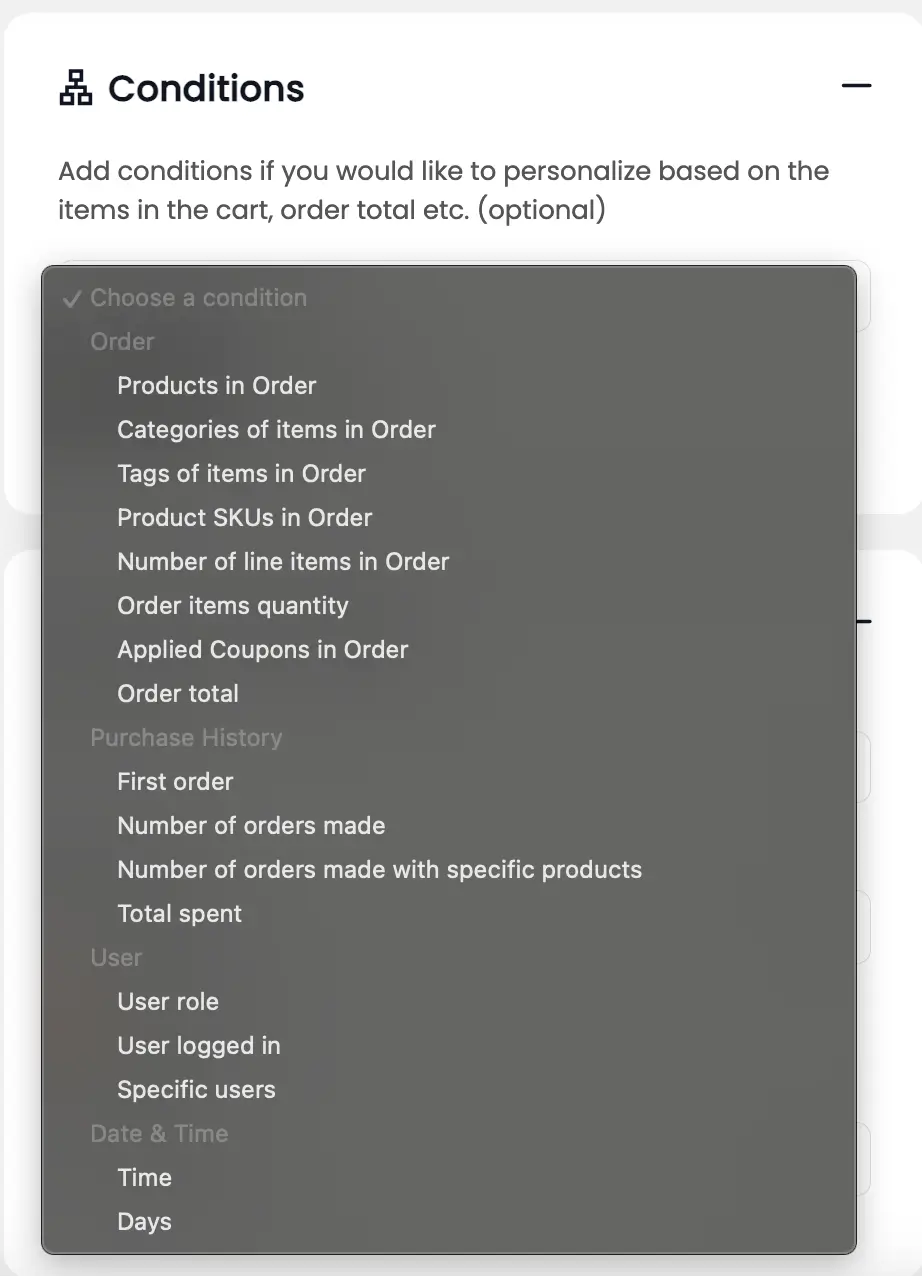
Most boosters support “conditional visibility” based on order, time, and other parameters. These rules allow you to target very specific use cases, like:
– Show only during business hours (e.g., 9:00 AM – 6:00 PM)
– Activate only when a product from category “Accessories” is purchased
– Display for users from specific roles (e.g., logged-in customers)
Frontend Result #
Once configured, the booster displays the selected product combination on the product page, allowing customers to easily add the full set with a single click.
Preview
The popup is displayed dynamically when a customer interacts with your store — based on the selected trigger settings.
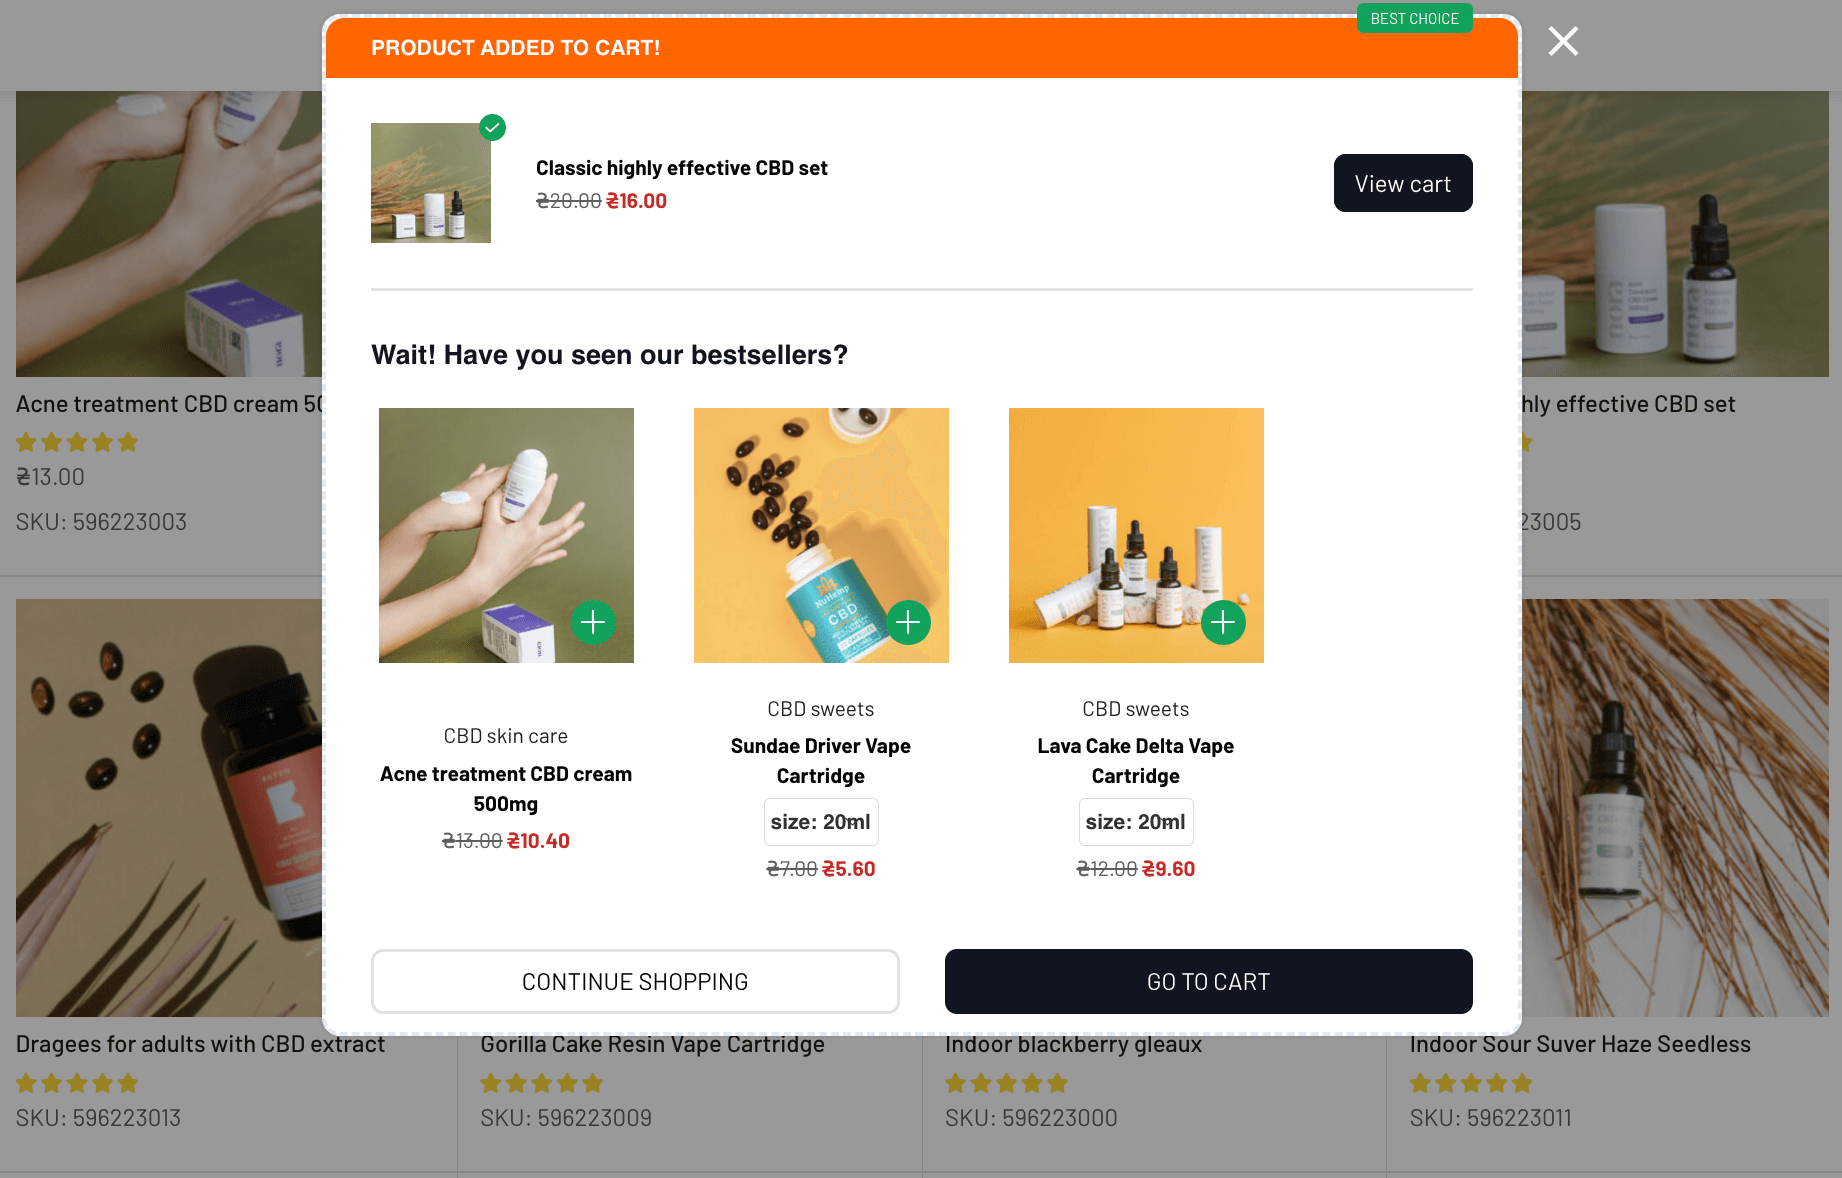
It works across all pages and themes, providing a seamless, real-time product recommendation experience.
Troubleshooting #
If your booster isn’t displaying as expected, check the following:
- Confirm the booster is enabled in the dashboard
- Check that triggers are set correctly
- Verify your display conditions (device, role, schedule, etc.)
- Check that selected products are published and in stock
- Temporarily disable caching or popup-blocking extensions during testing