Blog post layout / graphical (bug) tweaks

This topic has 6 replies, 3 voices, and was last updated 3 months, 1 weeks ago ago by Andrew Mitchell

  • Avatar: Mathew
    Mathew
    Participant
    February 1, 2024 at 10:58

    As final tweaks, I’m hoping to solve some minor display things:

    In the privately shared blog post screenshots (Desktop & Mobile), there’s following things that I’d like to tweak:
    1) Removal of “Posted by …” , only displaying the date on that line would be preferred.
    2) Removal of “Tags: …” at the bottom of the post.
    3) Adding margin between the white ‘title box’ and the actual blog post text below it. It just looks wrong having the text directly against it.
    4) On the Mobile version, the white ‘title box’ needs some padding above the bog post title, it looks wrong now.

    Other minor tweaks I’d like to do:
    A)
    Scroll Up button
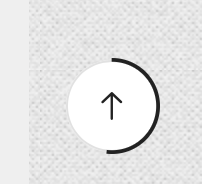
    I cannot seem to find how the black color of this Scroll Up button would be changed into something else?

    B)
    Next/Prev Product button
    This is the Prev/Next Product button. Is it possible to either remove these (like you can remove the Prev/Next Blog post buttons), or change the color of them?

    C)
    Remove the “Continue reading” from blog posts shown with the 8theme Blog and 8theme Blog Carrousel elements. One can click the picture to go to the full post, it would look much neater without the ‘Continue reading’.

    Many thanks!

    Please, contact administrator
    for this information.
    5 Answers
    Avatar: Tony Rodriguez
    Tony Rodriguez
    Support staff
    February 1, 2024 at 14:04

    Hello, @Mathew,

    I hope this message finds you well.

    1/ We would like to provide you with instructions to remove the “Posted by …” text from the single post page on your website. Kindly follow the steps outlined below:

    1. Navigate to the “Xstore” section in your website’s dashboard.
    2. Proceed to “Theme Options.”
    3. Click on “Theme Custom CSS.”
    4. Select the “Global CSS” tab.
    5. Copy and paste the following CSS code into the provided area:

    .single-post .meta-post time.entry-date.published.updated {
    visibility: visible !important;
    }
    .single-post .meta-post {
    visibility: hidden !important;
    }

    2/ We would like to provide you with the necessary steps to remove the “Tags” section from the bottom of the single post page on your website. Please follow the instructions below:

    1. Navigate to the “Xstore” section in your website’s dashboard.
    2. Proceed to “Theme Options” and then select “Theme Custom CSS.”
    3. Click on “Global CSS.”
    4. Copy the following CSS code and paste it into the provided area:

    .single-post .single-tags {
    display: none !important;
    }

    3/ We would like to guide you through the process of increasing the margin between the white title box and the text of your blog post. To achieve this, kindly follow the steps outlined below:

    1. Navigate to the “Xstore” section in your website’s dashboard.
    2. Proceed to “Theme Options” and then select “Theme Custom CSS”.
    3. Click on “Global CSS”.
    4. Copy the following CSS code and paste it into the provided area:

    .single-post .post-heading {
    margin-bottom: 20px !important;
    }

    4/ We would like to inform you of a necessary adjustment to enhance the appearance of the blog post titles on the mobile version of your website. To achieve the desired padding above the blog post title, please follow the instructions below:

    1. Navigate to the “Xstore” section in your website’s admin panel.
    2. Proceed to “Theme Options” and then select “Theme Custom CSS.”
    3. Click on “Global CSS.”
    4. Copy and paste the following CSS code into the provided area:

    @media(max-width:991px) {
    .single-post .post-heading {
    padding-top: 20px !important;
    }
    }

    4-A/ We would like to guide you through the process of altering the color of the “scroll to top” icon and its border on your website. Kindly follow the steps outlined below:

    1. Please navigate to the “Xstore” section of your dashboard.
    2. Proceed to “Theme Options.”
    3. Select “Theme Custom CSS.”
    4. Click on “Global CSS.”

    Once there, copy and paste the following CSS code:

    .back-top svg path {
    stroke: red !important;
    }
    .back-top span.et-icon.et-right-arrow-2::before {
    color: red !important;
    }

    After applying the code, revisit your site to view the changes.

    Please note that the color ‘red’ in the provided code is merely an example. You are free to replace it with any color of your choice to suit your design preferences.

    4-B/ Should you wish to disable the Previous/Next Product navigation feature, kindly proceed to the following location within your dashboard: Xstore > Theme Options > WooCommerce > Single Product Builder. Once there, you can deactivate the Prev/Next Navigation by toggling it to the OFF position.

    Furthermore, if you are interested in altering the color of this navigation, please copy the CSS code provided below and insert it into the designated area at Xstore > Theme Options > Theme Custom CSS > Global CSS. You may then adjust the color within the code to suit your preferences.

    .single-product .posts-nav-btn .post-nav-arrow {
    background-color: red !important;
    }

    4-C/ To address your request regarding the removal of the “Continue reading” link from your blog posts, kindly follow the steps outlined below:

    1. Access the Xstore section.
    2. Proceed to Theme Options.
    3. Select Blog.
    4. Navigate to Blog Layout.
    5. Locate the “Type Of ‘Read More’ Link” setting.
    6. Set this option to “Disable.”

    Implementing these changes should effectively resolve the issue you are experiencing.

    After completing these steps, please clear your browser’s cache and revisit your site to see the changes.

    Should you require any further assistance, please do not hesitate to reach out.

    Best regards,
    The 8Theme Team

    Avatar: Mathew
    Mathew
    Participant
    February 1, 2024 at 14:29

    Hi Tony,

    Thanks a lot for the great and fast support!
    Everything works great.

    My apologies that I seem to have missed some of the settings that were simply there, thanks for guiding me to where to find them 🙂

    One last little thing: on the blog post, now that the ‘Posted by’ has been successfully removed, is it possible to have the date aligned center?

    Thanks again!

    Avatar: Tony Rodriguez
    Tony Rodriguez
    Support staff
    February 2, 2024 at 08:15

    Hello, @Mathew,

    Should you desire to center-align the date, we kindly ask that you implement the following CSS code. Please navigate to XStore > Theme Options > Theme Custom CSS > Global CSS and paste the code provided below:

    @media (min-width: 992px) {
        .single-post .meta-post {
            margin-left: 25% !important;
        }
    }
    @media (max-width: 991px) {
        .single-post .meta-post {
            margin-left: 35% !important;
        }
    }

    We trust that this adjustment will address your concern effectively.

    Warm regards,
    The 8Theme Team

    Avatar: Mathew
    Mathew
    Participant
    February 2, 2024 at 09:58

    Thanks again, looks perfect now!

    Avatar: Andrew Mitchell
    Andrew Mitchell
    Support staff
    February 2, 2024 at 09:58

    Dear Mathew,

    We hope you’re reveling in the experience our theme brings! Your enthusiasm is what fuels our passion. Would you be so kind as to channel that energy into a 5-star rating on ThemeForest? Your feedback is the spark that lights our way!

    Click here to spread the love: https://themeforest.net/downloads

    Thank you for being an integral part of our journey!

    Best Regards,
    The 8Theme Team

  • Viewing 6 results - 1 through 6 (of 6 total)

The issue related to '‘Blog post layout / graphical (bug) tweaks’' has been successfully resolved, and the topic is now closed for further responses

We're using our own and third-party cookies to improve your experience and our website. Keep on browsing to accept our cookie policy.