Dear customers, we appreciate that you have chosen our theme! Classico – is an elegant and neat theme outside, at the same time with a powerful admin module inside. All the 8theme software products are developed with quality and distinguished not only by programming level, but also by effective teamwork of customer support in the process of theme using. Before theme installation and its use, we recommend firstly to examine the documentation in details, watch the video tutorials and look through the forum topics according to the questions you`re interested in.
Before using Classico theme you need to be sure that your server and WordPress meet theme requirements. Theme requires at least WordPress version 3.9+. Such problems as white screen after theme installation, out of memory errors, fails when importing demo content, etc as a rule are related to server settings and low PHP configuration limits. Change them by yourself or contact your hosting provider and ask to increase limits to a minimum as follow:
Use href=”https://wordpress.org/plugins/wordpress-php-info/ plugin to check your PHP configuration limits.
We aim to help our clients if they need additional information about the theme’s options and features or have any unresolved difficulties with template. For this reason support team is at your service. We are not able to provide support for code customization or third-party plugins! If you need advice with anything other than minor template customization, want to implement new functions or make theme compatible with third-party plugins we recommend to request developer help. To be helpful we prefer you contact us on Support Forum:
We would be very grateful if you use ThemeForest comments for presale requests only or questions that are not related to support. If you have a critical problem and really need to give us access to your account you can contact us by using contact form on our profile`s page on Themeforest https://themeforest.net/user/8theme – at the bottom of right sidebar.
After theme purchase, please, download the theme from ThemeForest. For that you need to enter Downloads area in your account on ThemeForest, where you will see all your purchased themes. Find Classico template among them and click on the Download button on the right from the main content. In the provided list you will see the opportunity to download the whole theme package with all additional files or the theme .zip file directly.
If you have downloaded the whole theme package, you will find there such files after extracting:
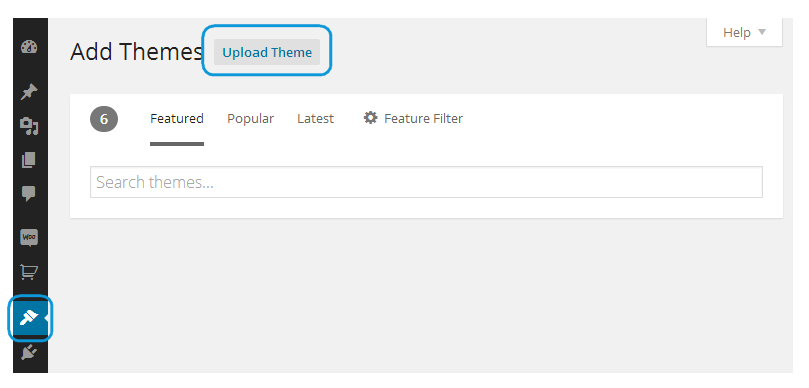
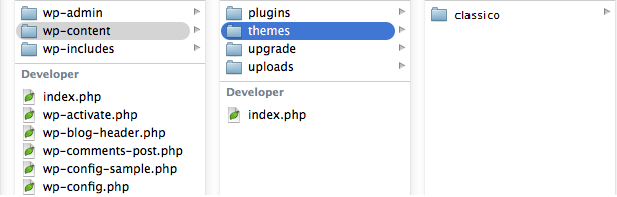
You can install the theme in two ways.
If you get an error:  This usually occurs when either the PHP memory limit or max post size for WordPress has been reached. The easiest workaround for this is to install theme through FTP (see above). Alternatively you’ll need to change a number of settings either on WordPress or on your web host.
Nothing stands still: the updates for WP and plugins are constantly released and they are included in our template. We supplement our theme with new features and fix all the issues. Because of this the 8theme team regularly updates themes. We recommend you to use always the last theme version to avoid the issues with incorrect template functioning. While the theme update the theme files will be rewritten and if you made any changes directly in them, the changes will be lost. So, if you are planning to customize your template, we insistently advise you to use Child Theme or Custom CSS area in Theme Options if your changes affect only CSS styles. The theme update affects only the theme files and does not influence the database. But, to avoid any difficulties, please, do the backup of theme files and database before any update.
Please, re-save your Classico options after upgrading the theme. Navigate to admin panel > Theme Options and hit Save changes.
To make settings up your site easy and faster you may import demo content. There are two ways you can import Classico Theme Demo Content:
This way allows you to import some pages, posts, projects, products, simple menu and main slider. To import our demo content follow the steps below:

If you don’t want to import all of our dummy content or just need separate pages from our demo, also if you can’t use one click import according to server settings Import of .XML files is your way. We included all the demo versions and additional pages import to XML files folder of theme package. There you’ll be able to see .xml files, Revolution slider archives, essential grid .json files. Classico Theme Options can also be imported by copying the text file and pasting the its content into the Import from file field on the Import/Export tab in Classico Theme Options.
Important: Images you get after demo content import can neither be used on a live site, nor redistributed. If you want to find out where images came from to buy the license use the image search engine https://www.tineye.com/.
First of all, we would like to specify that we do not guarantee the compatibility of our theme with all the third-party plugins for WordPress and WooCommerce. Our template is fully compatible only with the plugins that are included in our theme and also WooCommerce, WPML, Contact Form 7, and Mail Chimp plugin. You often (not always) need to customize the extension to make it work properly with your theme. It’s impossible for theme author to make the theme compatible with all existing extensions. Please, take that into your consideration and treat with understanding!
Classico theme includes a number of perfect third-party plugins that greatly increase the theme opportunities and open new horizons for your blog. The following plugins are attached to Classico theme:
As we are not these plugins developers, you may find on their developers’ websites all the setup information and documentation for them. The installation of every previously mentioned plugin will be required once after the theme activation.
In case if automatic plugin installation fails (as a rule it is because of your server settings), you can install them manually via your Dashboard: Plugins > Add New > Upload Plugin > Browse plugins archives. Or via FTP, by uploading and extracting the plugin zip files into wp-content/plugins folder. You can find the zip files for plugin installation in the theme folder classico/theme/plugins.
Plugins authors regularly release the updates and in order to use all the features or fix already found issues, we recommend you to follow the plugins versions and update them on your installations. The latest version of plugins you can always find here – https://www.8theme.com/downloads/. To update the plugins, switch to your server with FTP. Copy extracted plugins folders into wp-content/plugins/ folder.
All the plugins included in our theme are external and we have the right to build them into our theme as we purchase the Extended License for each of these plugins. The plugins run perfectly and are fully functional. Keep in mind, we are constantly including the plugin updated versions and while every theme update you may find the actual plugin version in the theme folder. There is no doubt that you can get the current plugin version directly from us. For that, it will be enough to login to your account on our site (https://www.8theme.com/my-account/), then go to https://www.8theme.com/downloads/ page, enter your purchase code and you’ll get access to all necessary archives. These plugins registration is not obligatory! The plugins are functioning perfect without any activation. The plugin activation option was added in the plugin only for the customers to get automatic updates and support directly from plugin developers. Only in case you need this features you will need to purchase and register the plugin. This is not only our practice but all the theme authors from ThemeForest.
Your customers can browse through your store and add items to list to compile an itemization of goods or services they desire. Firstly create WishList page if it’s not created yet using following shortcode [yith_wcwl_wishlist] Go to YIT Plugins > WishList and select “After “Add to cart”” for Position option.

Classico theme is managed through settings called 8Theme Options, 8theme Page Layout and 8theme Product Options. 8Theme Options are located in Dashboard > 8theme Options and contain settings organized into logical tabbed sections. These are global options for your website. If you want to set specific options for a particular product, page or post, set them in 8theme Product Options or 8theme Layout, which have a higher priority and are located in every product or page/post.
General – In this section you can set up some general options for your site like Layout, Header Settings, Footer.
Styling – These options allow you to set custom colors for all the elements around site.
Typography – You can set up fonts for your website.
E-commerce – Options related to integration between Classico and WooCommerce.
Blog and Portfolio – In this section you can set up options related with blog and portfolio.
Import/Export – This section allows to install Dummy content or move settings from theme options between themes or when you move your website from test site to live.
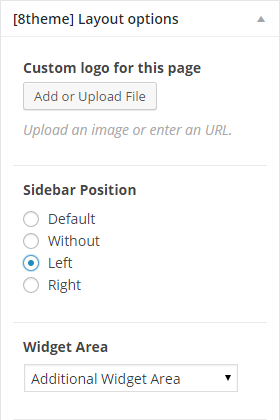
Custom logo for this page – You can upload custom logo that will be visible on this page only.
Sidebar Position – Select position of sidebar if you need it different from selected in global 8Theme Options.
Widget Area – Allows you to choose what widget area you want to display. You may use even the custom one.
Sidebar width – Set width of sidebar on this page.
Custom navigation for this page – If you want to use the navigation different from the main one use this option.
One page navigation -Enable in case you need to use one page navigation. Read here how to create One Page.
Show Page Heading – Ability to enable/disable Page Heading.
Breadcrumbs Style – If you need to use breadcrumbs type different from the global one this option is for you. Use Featured image to upload breadcrumbs background for this page only.
Page slider – Allows you to use full width slider instead of page heading.
Use custom footer for this page – This option allows you to select custom footer for this page. Use Static Block to create custom footer.
Static blocks is a great Classico theme feature that makes adding content to your site easy and convenient. Static blocks allow you to add additional content for product, create footer layout, facilitate creation of promo popup etc. Static blocks can be used anywhere on your site to display text, images, sliders, widgetised sidebars etc. Go to Dashboard > Static Block > Add new and you’ll be able to compose block layout in no time.
Important: If you want to use WPBakery Page builder to build block layout don’t forget to select it in WPBakery Page builder settings.
There are 5 default widget areas, which you can use to add your own content and functionality (Appearance > Widgets):
You can create additional sidebars to add your own content and functionality and to use different sidebars on different pages/posts. Navigate to Appearance > Widgets. Fill in Custom Sidebar title and press Add Sidebar button.
Place necessary widgets into newly created sidebar. Then create page (Pages > Add New) and on the right side of the 8theme Layout Options choose Sidebar Position, necessary Sidebar Width and desired Widget Area.
Pages are almost the main element while create site. They are intended for static content that’s why pages are a good way to publish information that doesn’t change much. You can create any number of pages with content. Also Classico theme includes 2 additional page layouts – Blank Page and Portfolio – to create specific pages.
To get started adding a new page to your site navigate to Dashboard > Pages > Add new. Add the title of the page. If you have pretty permalinks set up, the title of your page will also be the URL slug.
Next, add some content. We recommend to use WPBakery Page builder editor if you want to add something more than just a simple text content.
The 8theme Layout Options section allows you to set specific options to make your page look in a best way. Detailed information you can find reading 4.2. 8theme Layout settings.
Preview the page one last time, then click Publish. You’ve added a new page to your WordPress site.
Single page WordPress websites are growing in popularity and Classico allows you to make a one page site with a parallax scrolling menu. Just follow few simple steps bellow.


If you want to receive feedback from your visitors, having a Contact Us page on your site is an easy way to achieve that.
Go to Pages > Add new and create a page called “Contact Us” (or whatever you want your contacts page called).
To add contact form use specially created WPBakery Page builder element – 8theme Contact Form
To add your email for contact form, navigate to 8Theme Options > General > Contact Form.
You may also use our theme as a Portfolio. It is the perfect way to share your artwork, photography, or anything visual you want to show off.
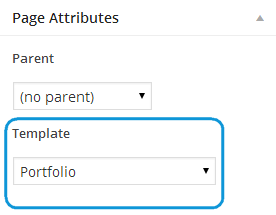
Create Portfolio Page and set the page template (under Page Attributes) to Portfolio. It will be the main page with all your projects.
Then go to 8Theme Options > Blog & Portfolio > Portfolio and set necessary options.
You may create New Projects at Portfolio > Add New.
Classico includes Blank Page template that allow you to build pages without showing the header or footer. They are perfect to create a landing page design or for such pages like “Maintenance Mode” or “Coming Soon”.
You can use all the same page options and element for content.
By default WordPress displays your content in a blog format on the homepage. But if you want to create a separate page for blog posts just fo the following:
Classico supports custom WordPress menu. Custom menus may contain links to pages, categories, custom links or other content types. If you want to add special things to menu like product and portfolio categories, posts categories, classes for links, etc. then please click on Screen options button in right top corner where you’ll be able to choose much more options that can be used for menu items.
There is no limit on how many menus you can create. Classico theme includes 2 menu location: main and mobile menu. In section Theme Locations you can choose which custom menu to associate with each location.
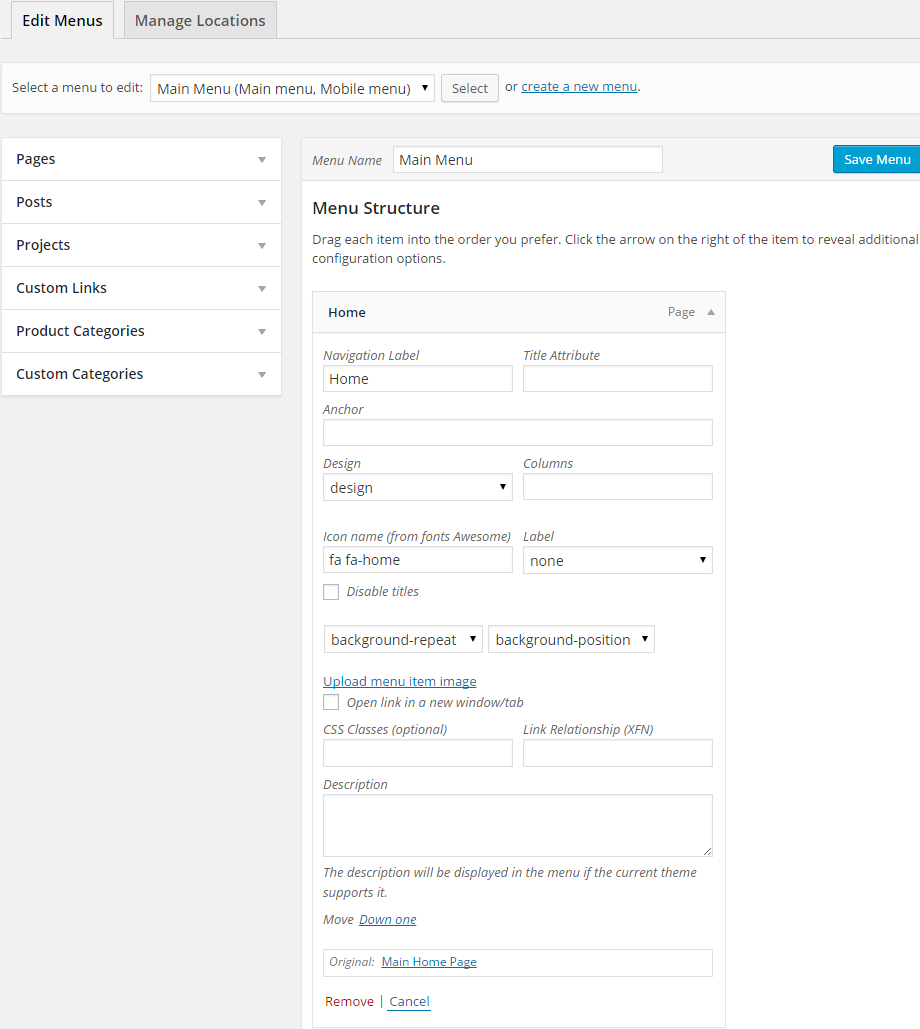
To create new menu navigate to Dashboard > Appearance > Menus page and press on create a new menu link. Now you can add Pages, Posts and Custom Links from blocks located on the left. When you have your menu items arranged in order click on Save Menu.
 Classico theme has a number of additional settings to create menu:
Important note: you need to save menu after adding menu items to display the theme settings for menu!
Due to a limitation in WordPress the Mega Menu will not be enabled when you import our demo content. It’s because custom menu settings are not allowed to import.
But follow the steps bellow and you’ll create Mega Menu in no time.
Also you can use image in your menu:
To set the background image for the Submenu Area add image for the first level menu item.
To add image as Mega Menu Column select Custom Links on the left hand side and click the Add to Menu button. Move it to Second level of your menu. Select Image Column or Image Column, No Space (if you don’t want margins around the image) from the Design drop-down. Then press on Upload menu item image link and set your image. Fill in URL field in case you need to add link for your image or use # if you don’t need it. Save menu.
To create footer we have used Static Blocks – a great feature implemented in Classico theme to facilitate compositing of sidebars, footer, and other areas.
You can add it using 8theme – Static Block widget or with the help of shortcode
[block id=” “]
To make this process easier for you we have included XML files to import some examples of footer static blocks. You can find these XMLs in XML files folder of theme package.
Classico is compatible with WooCommerce and includes design integration as well as custom shortcodes. WooCommerce is external plugin and theme documentation includes only basic information to get started. Below you can find links that have additional information about using WooCommerce.
WooCommerce plugin installation will be provided once after the theme activation. You should install the WooCommerce plugin before demo content import! Activate the plugin and install WooCommerce Pages.
The translation file default.pot you can find in Translation Files folder in theme package. Edit the .po file using http://www.poedit.net/, use the translation field to make replacements. Read here how to do it right.
From the file menu, save file with your language name e.g de_DE.po. It will generate both a .po and .mo files for your translation. Place these files into languages folder /wp-content/themes/classico/languages.
Or you can use the Loco Translate plugin.
Classico is WPML compatible theme that means you may translate template to the language you need. To start you need to purchase a recent version of WPML, including the String Translation and Translation Management modules.
Follow Getting Started Guide http://wpml.org/documentation/getting-started-guide/ after core WPML plugins installation.
To begin translation go to WPML > Theme and Plugin Localization. Click on Scan the theme for strings and you will see theme strings and which ones are translated or not. Then select WPML > String translation and a list of the strings in the theme will be available. Choose the string you need to translate and press the translation link to add translations to languages.
To translate the custom post types and taxonomies (static blocks, projects, testimonials), go to WPML > Translation Management. Select Multilingual Content Management.
Navigate to Custom Posts where you can choose the translations for Projects, Static Blocks, Testimonials.
Navigate to Custom taxonomies below, you’ll be able to choose the translations for Brands and Portfolio Categories.
A WordPress child theme is a theme that inherits the functionality of the parent theme. With child theme you can make modification or add additional functionality to parent theme. A child theme is the safest and easiest way to modify an existing theme, whether you want to make a few tiny changes or extensive changes.
We have already created and included child theme in theme package. You just need to find classico-child folder in theme package and upload it to /wp-content/themes/ folder.